DIY Mother's Day Gifts for a Present From the Heart
Whether it's for your mom, grandmother, aunt, or any of the other special woman in your life, one of these DIY Mother's Day ideas will make a kind and thoughtful gift. If you're going entirely DIY or want something small to accompany the Mother's Day gifts you've already purchased, look no further than this list of creative crafts. From gorgeous floral arrangements to personalized home decor, there's something in here that will suit any style. (You can also download and print one of these fun "Do Not Disturb" Mother's Day door hangers or "Best Mom Ever" certificates—hey, printing counts as DIY!)
For a small but heartfelt creation, sew a pillow sham from a vintage handkerchief or fashion a clay trinket dish with a saying she loves stamped on the bottom. We also have ideas for more involved projects, such as a basket backpack mom can use to tote her important items or the Mason jar string art for a beautiful wall decoration. Don't have a lot of time, no worries, there are plenty of last minutes ideas you can easily put together. Some of these ideas make for stunning spring crafts by incorporating lots of floral ideas, including homemade vases and seed packets. However you want to celebrate mom and the special women in your life this year, you're sure to make their hearts full with one of these meaningful DIY Mother's Day gifts they'll cherish forever.

Created from grosgrain ribbon and vintage or new buttons, mom will love setting the table with these sweet DIY napkin rings.
To make: For each napkin ring, cut 3/8-inch-wide white grosgrain ribbon into five 3-inch-long pieces; round ends. Glue one piece on top of the next, offsetting as you go to create a flower shape. Glue a yellow button in center and a length of green twine to back for tying.

Mom can store her favorite candy, makeup, or car keys in this simple to make dyed cotton basket.
To make: Dip the top quarter of a cotton basket in desired color of fabric dye. When dry, fill candy or other trinkets.

Made from the common paper egg carton, Mom will love hanging this wreath on a covered door or over the mantel.
To make: Cut individual egg cups from paper egg cartons. Notch and cut decorative edges with scissors. Dye or paint cups desired colors. Attach cups and craft paper leaves to a painted craft ring with hot-glue.

Make a custom papier-maché planter to hold that beatiful bouquet you plan to gift mom this year.
To make: Blow up a large and a medium balloon. Cover each with white papier-maché craft paper, leaving bottom quarter to third uncovered and edges rough. Let dry. Pop balloons, and remove. Set a vase inside each, and fill with water and flowers.

Download one of our dozens of free cross-stitch patterns and stitch up something special for Mom. She'll appreciate the effort you took to make something just for her.
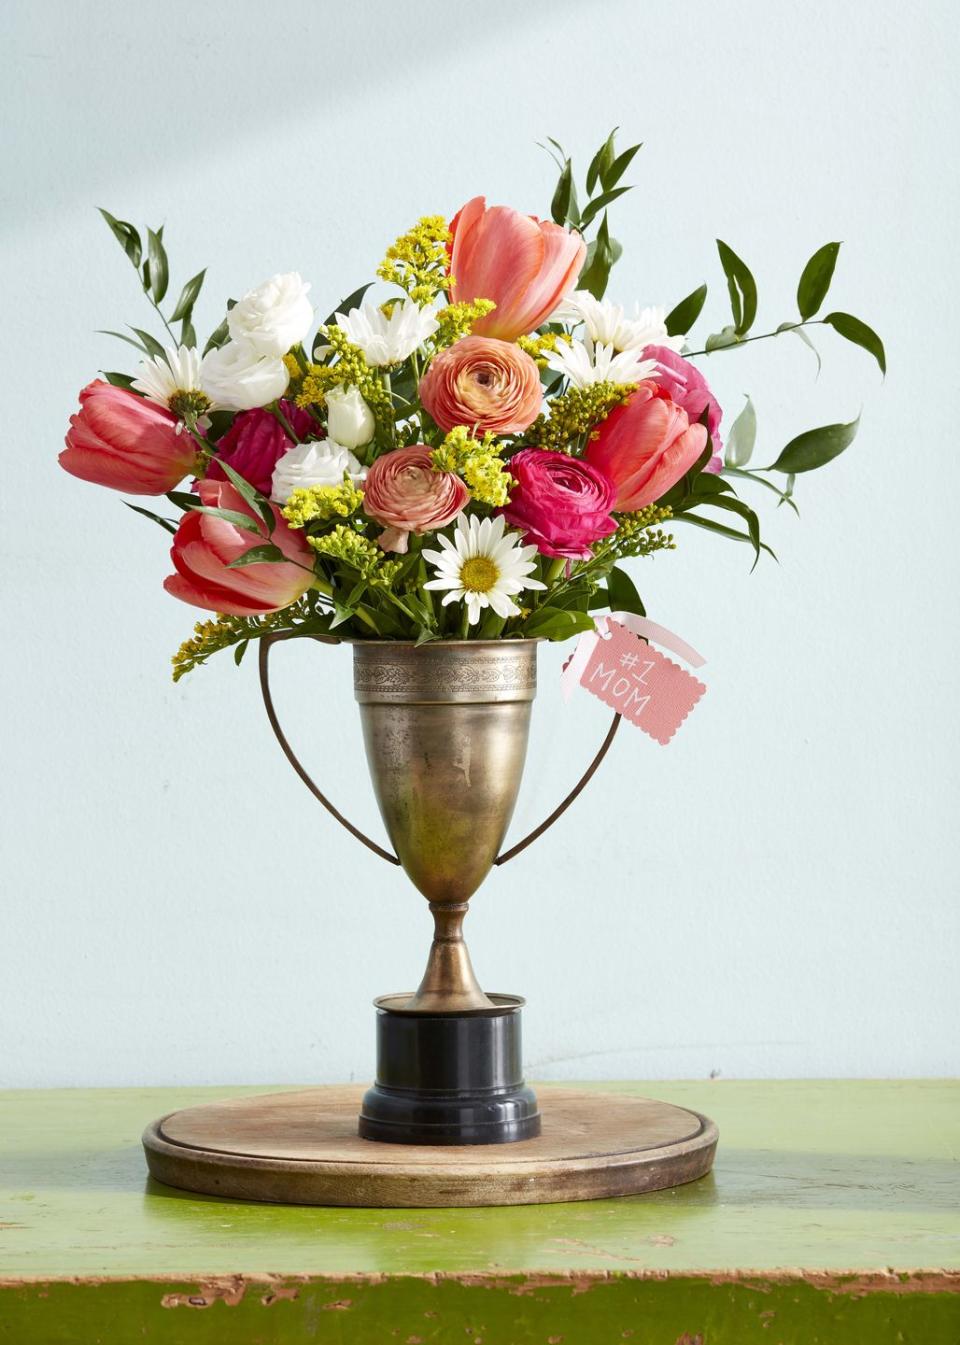
What better way to tell Mom that she's number one than with this prize of a bouquet? Arrange colorful flowers in a vintage prize trophy, and tie a handwritten tag around the handle with some pretty ribbon.
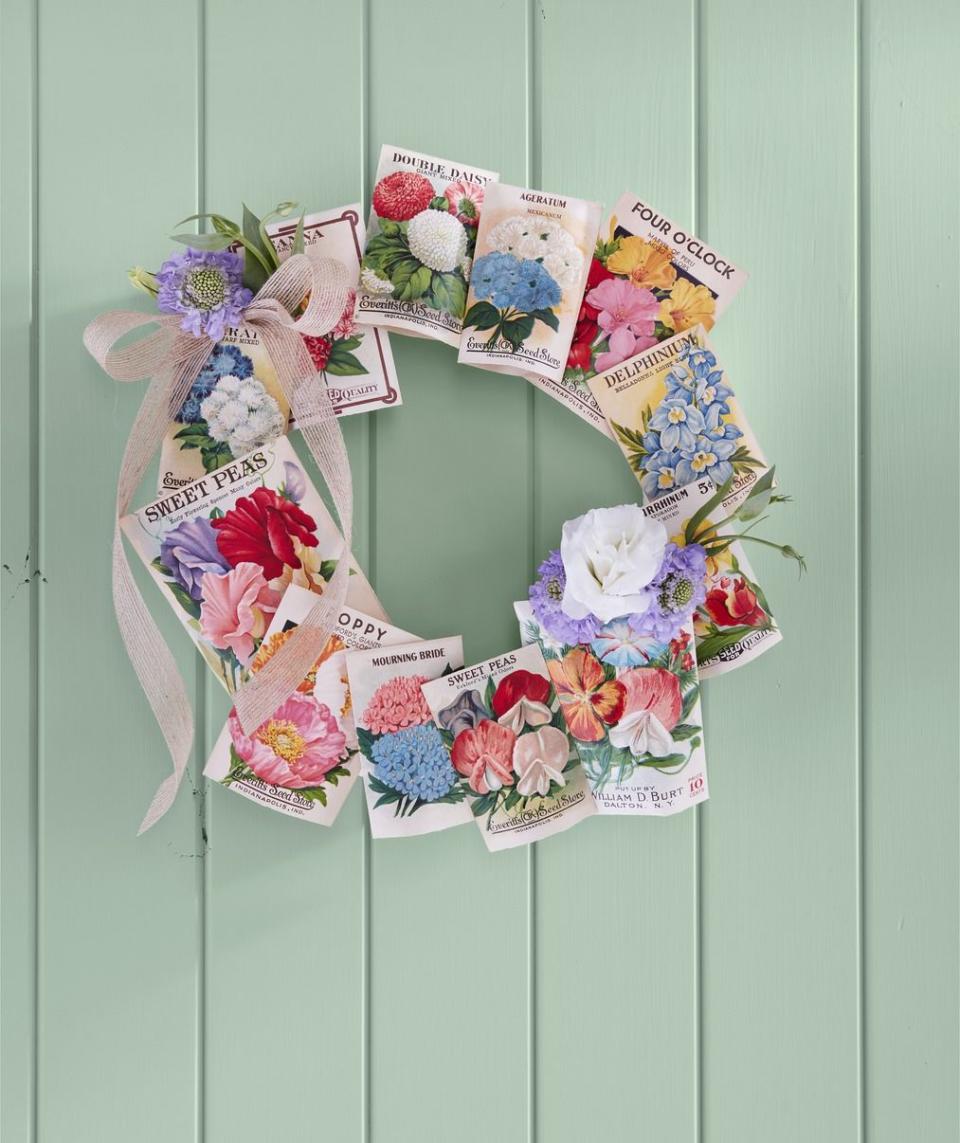
This unique wreath instantly takes your mom's spring decor to the next level. Attach about 12-14 vintage seed packets to a 12-inch foam wreath with straight pins. Finish off with a decorative piece of hemp ribbon and a few stray florals.
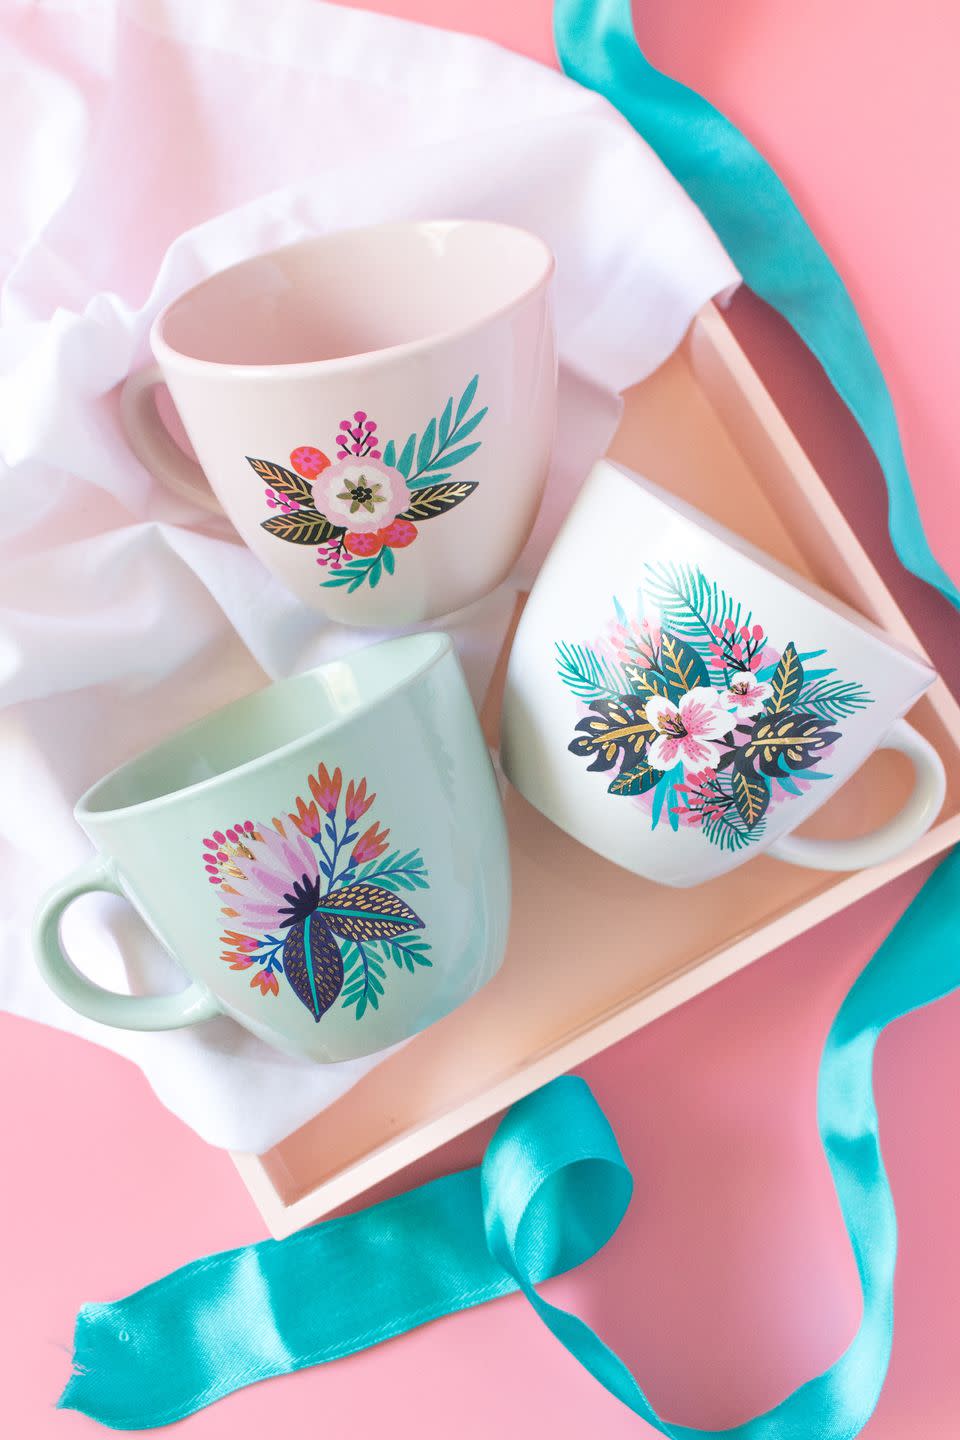
Create these gorgeous floral mugs that will make your mom think of you with every cup of morning joe.
Get the tutorial at Sarah Hearts.

Gift a pretty custom pillowcase that will beautify Mom's favorite chair. Attach a handkerchief to one side of a solid-colored pillowcase using embroidery thread and a whipstitch.
For those mothers who love to sew, create a custom pin cushion that is sure to become a prized possession for years to come. Start by wrapping a handkerchief or piece of fabric around a pouf of batting. Attach it (with the batting sandwiched in between) to the bottom of a Mason jar lid with hot-glue; trim excess. Place metal screw band over pin cushion and attach to jar.

If organization is Mom's middle name, make all her dreams come true with a DIY spice rack. Simply screw small wooden cheese boxes onto a leftover cutting board, then attach a leather strap to hang the one-of-a-kind kitchen craft.

Sit Mom at the head of the table and celebrate her with an embroidery hoop stitched with her initial. To make, place a piece of fabric in an embroidery hoop and embroider desired letter. Adjust fabric if necessary, to make sure letter is in the center of the hoop. Cut off excess fabric, leaving a one-inch overhang. Tack overhang to the inside of the hoop using hot-glue.

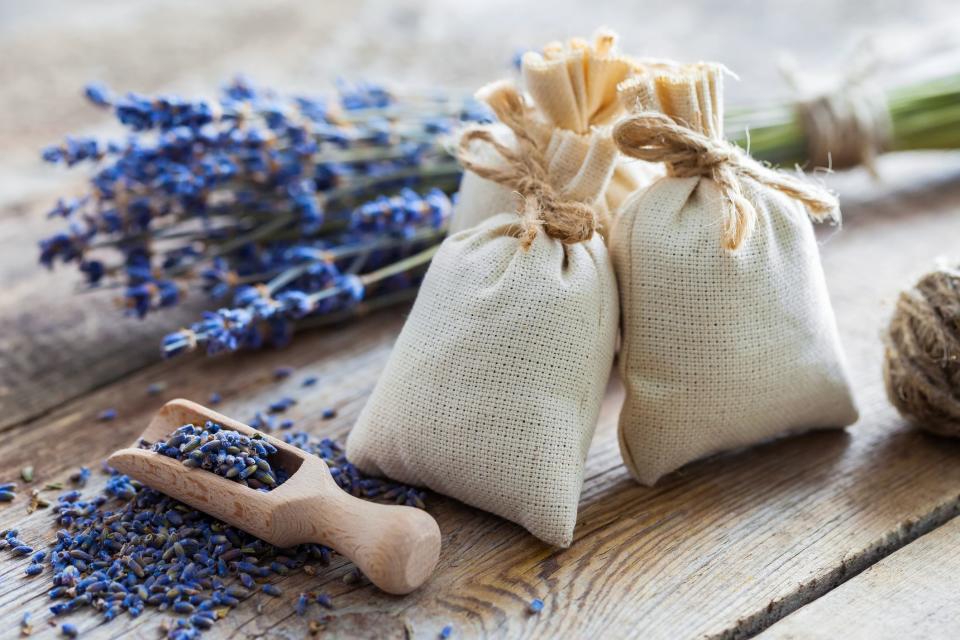
A sweet-smelling lavender sachet will brighten up Mom's purse or drawer. To make, cut a 2-by-4-inch rectangle from a handkerchief. Fold in half crosswise with the pattern facing inward. Stitch two sides closed with a sewing machine; turn pouch right-side out. Fill with dried lavender. Hand-stitch opening closed.
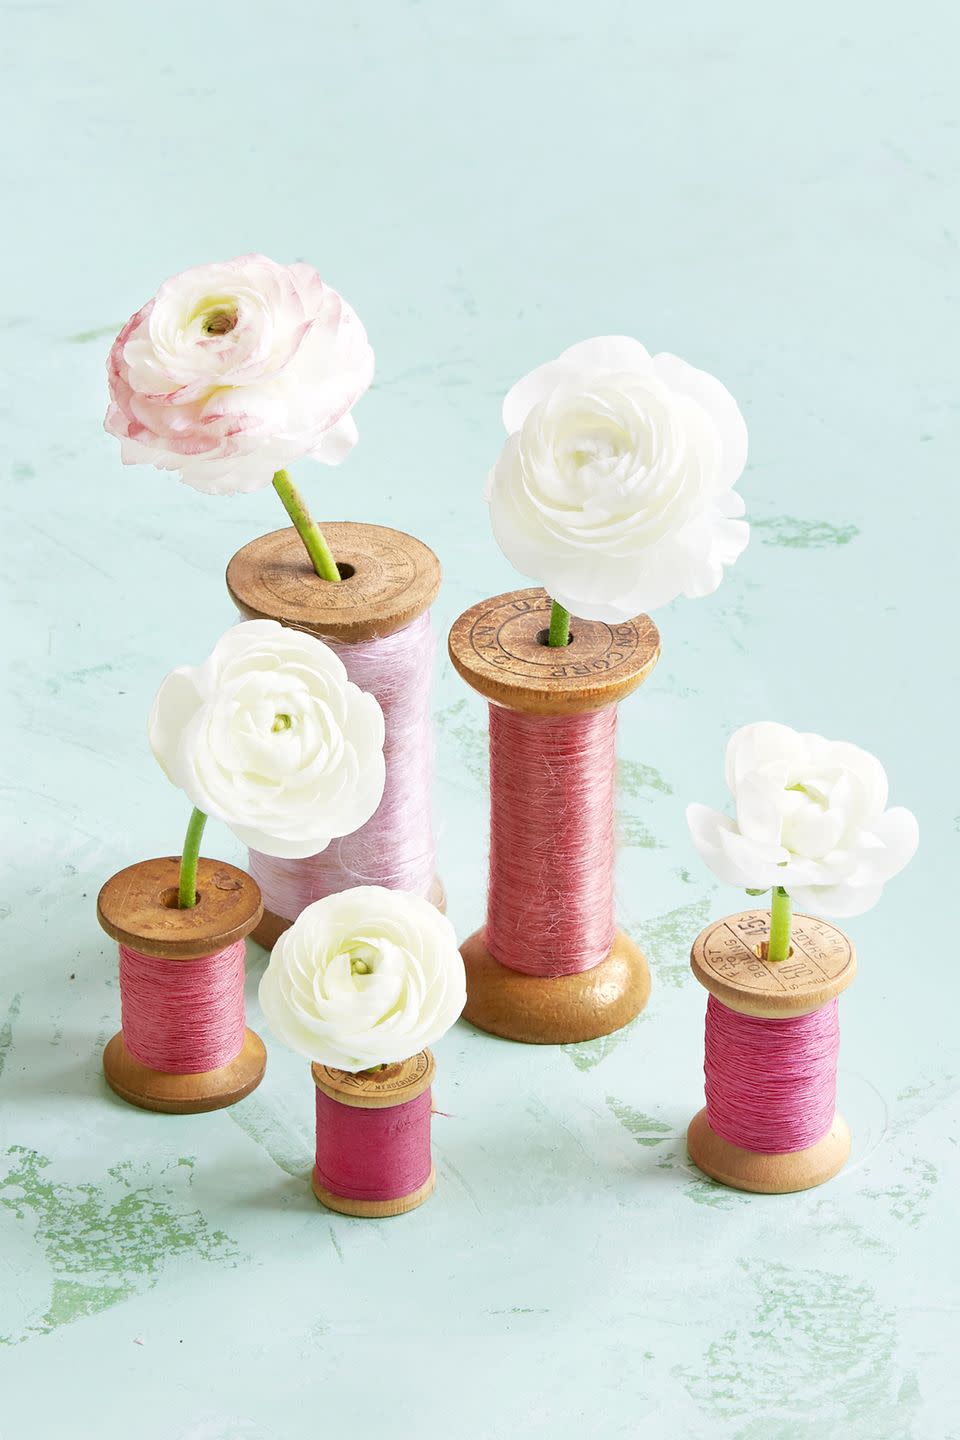
This is the perfect centerpiece for a breakfast-in-bed tray! Insert the stems of flowers (here, ranunculus) into the tubes of assorted spools. For longer-lasting blooms, add floral foam, which you can dampen with a straw. Arrange these adorable flower-spools on your table or around your home for a simple, charming detail.

For moms with a green thumb give a gift that keeps on giving – a live plant nestled in a custom covered ceramic planter. Wrap a ceramic hanging planter with a handkerchief, overlapping where necessary to make it lay flat. Use Mod Podge to adhere to the planter.

Moms love flowers but they also love sweet treats. (They're human, after all) Make her smile with a homemade or store-bought cupcake placed in a mini flowerpot. Adorn the pot with twine and a little note telling her why she’s the sweetest.
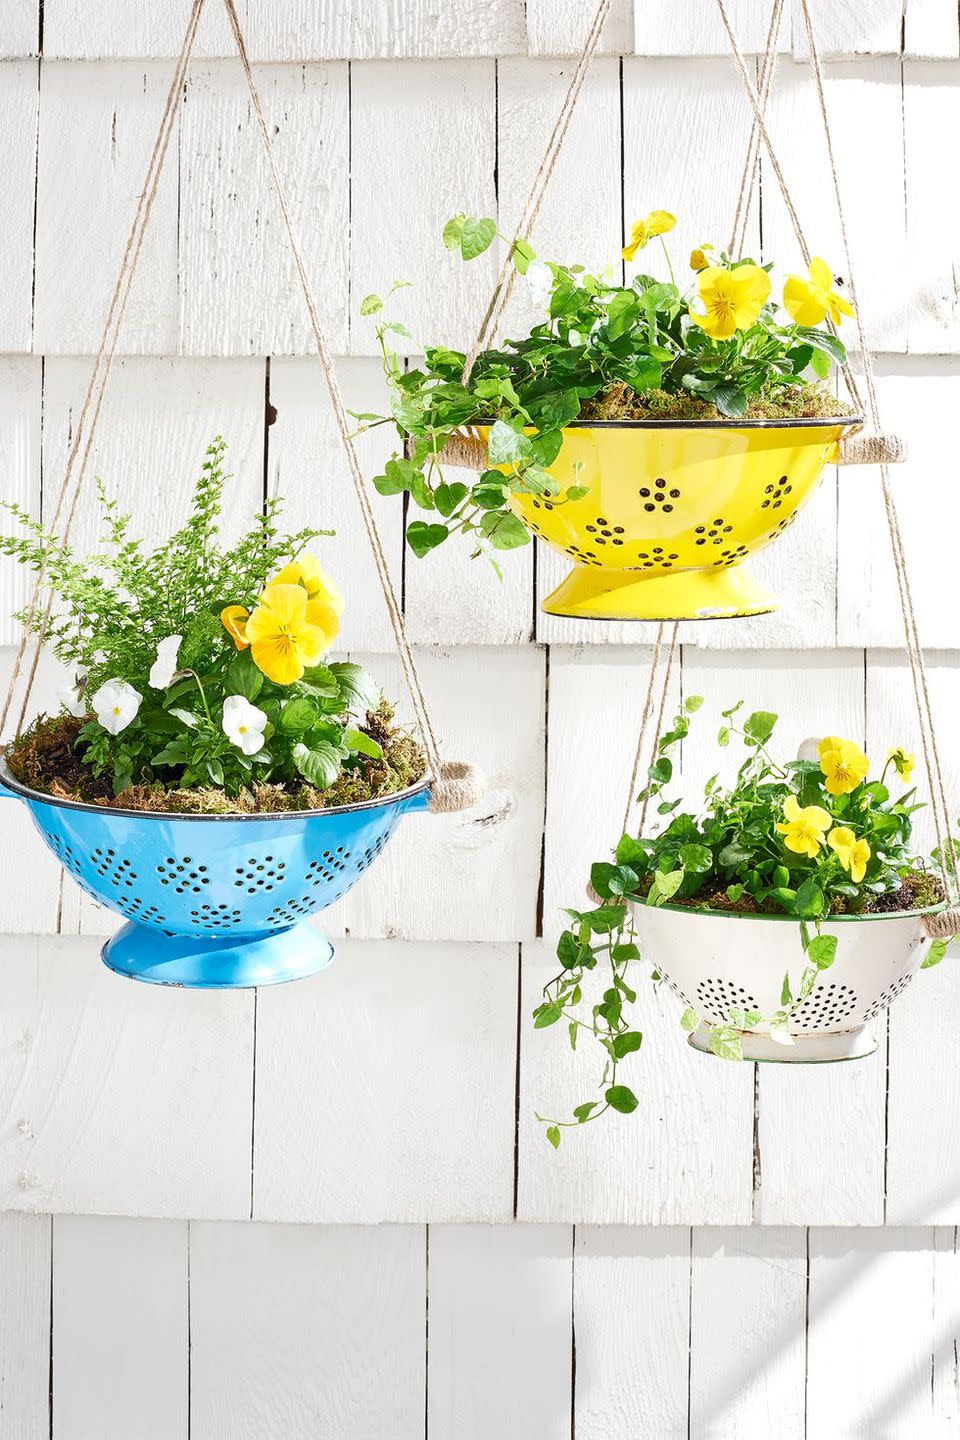
If Mom is in the market for a new colander, do something special with her old one! Strainers can turn into adorable planters to hang outside her home.
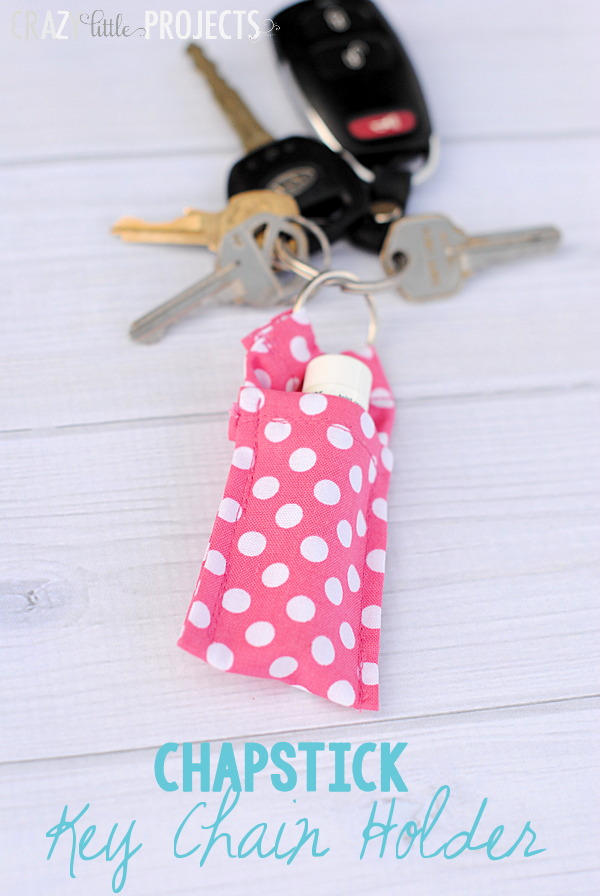
Pick out a pattern your mom will adore and sew this little keychain together so she'll never be caught without her Chapstick again.
Get the tutorial at Crazy Little Projects.
Scatter mini bouquets around the house so that Mom can feel the love wherever she goes. Simply insert garden flowers in kraft paper cones and leave them in pantries, on table tops, and even in the car. Or start her day right with a bountiful cone perched next to her morning cup of coffee!

You can customize these easy dishes with messages that will resonate the most with your mom, or maybe even an inside joke.
Get the tutorial at Little Red Window.
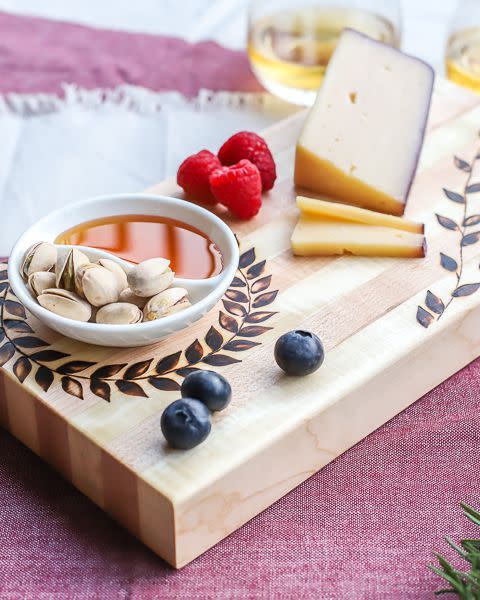
If your mom is always entertaining or cooking up something delicious, this is the perfect Mother's Day craft. And the wood burning tool that's responsible for those intricate, rustic-looking designs is always a good investment.
Get the tutorial at The House of Wood.

These delightfully springy cookies look best when they're layered in a gift box on a bed of parchment.
Get the recipe at Coley Cooks.
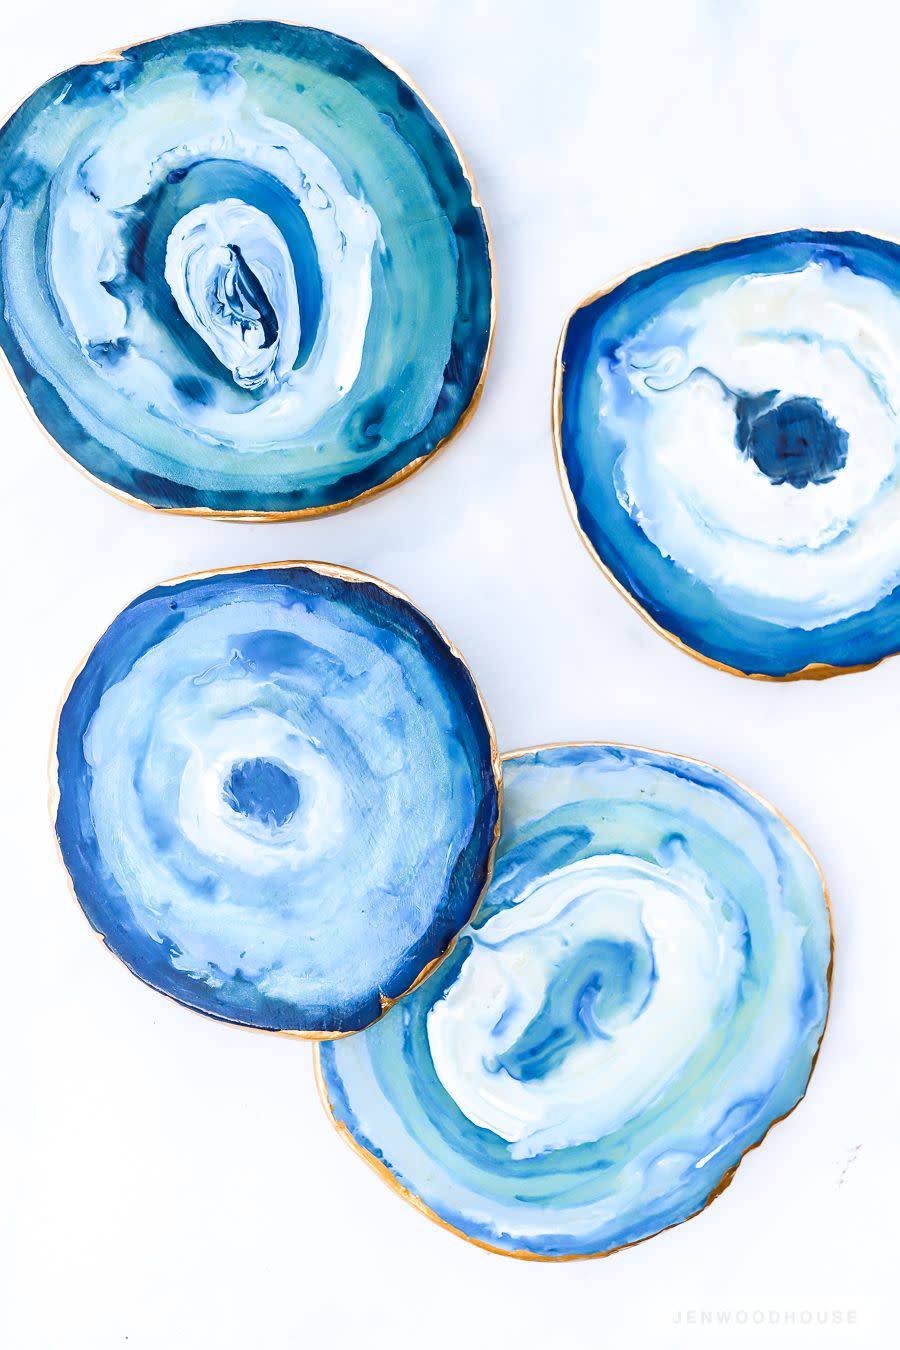
Believe it or not, these coasters are actually one of the easiest Mother's Day crafts on our list. They're made of polymer clay and acrylic paint!
Get the tutorial at The House of Wood.

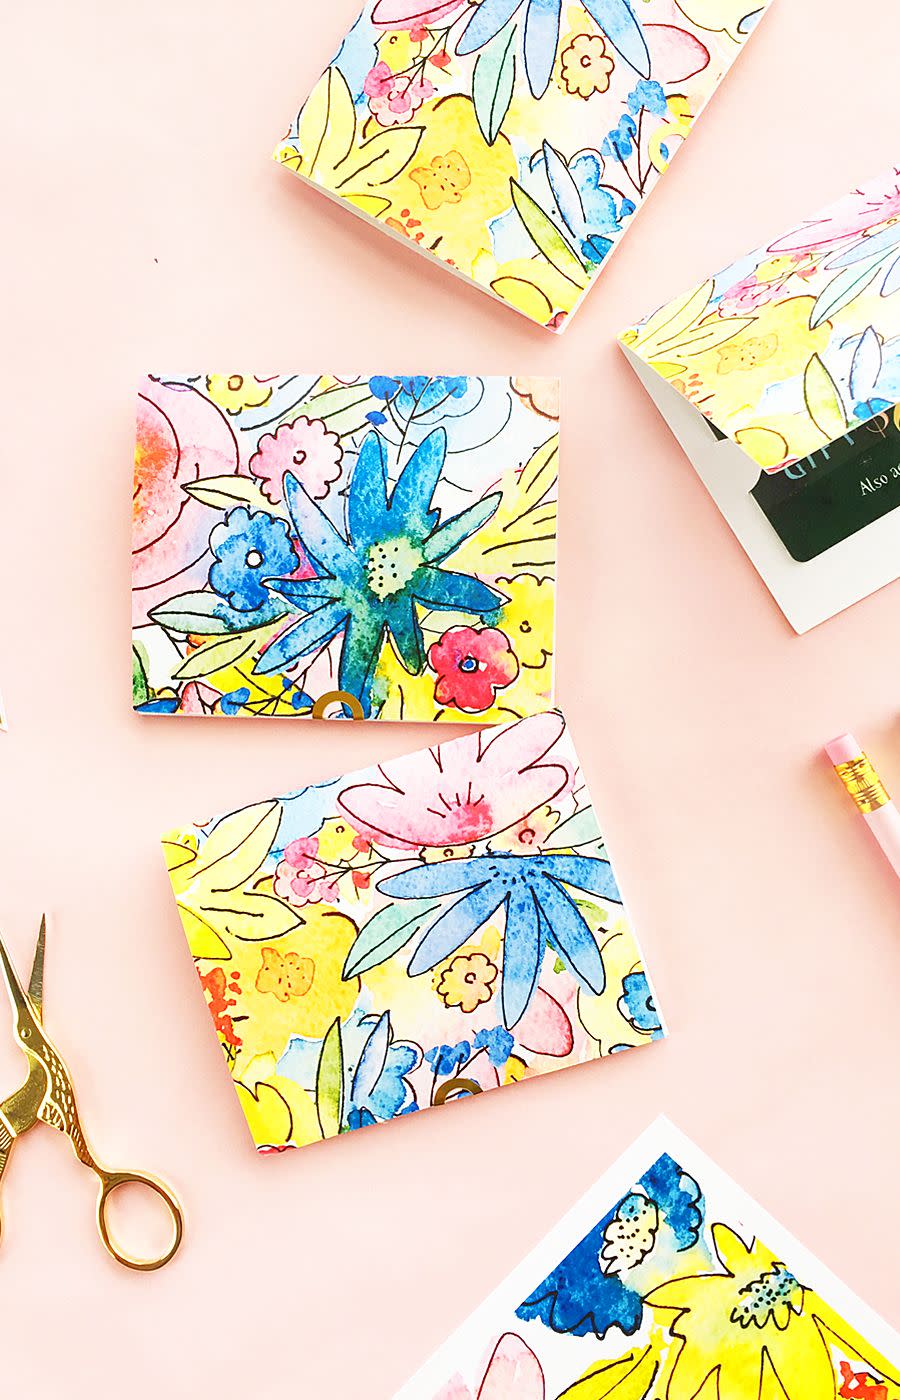
The perfect mix of sophistication and whimsy. What better way to revel in mid-May than with this DIY notebook?
Get the tutorial at Maritza Lisa.

Not only is this DIY seed packet adorable, it's also completely customizable if you'd like to add your mother's name to the packet. And since it reuses seeds from flowers you already have in your garden, it's good for the environment too.
Get the tutorial at LZ Cathcart.
Gift cards can be a relatively unexciting present—unless you present them this way, that is.
Get the tutorial at The House of Wood.

Who could resist this boozy, chocolate-y gift? The best part: Mom can repurpose that jar once the mix is gone.
Get the tutorial and recipe at The Cookie Rookie.
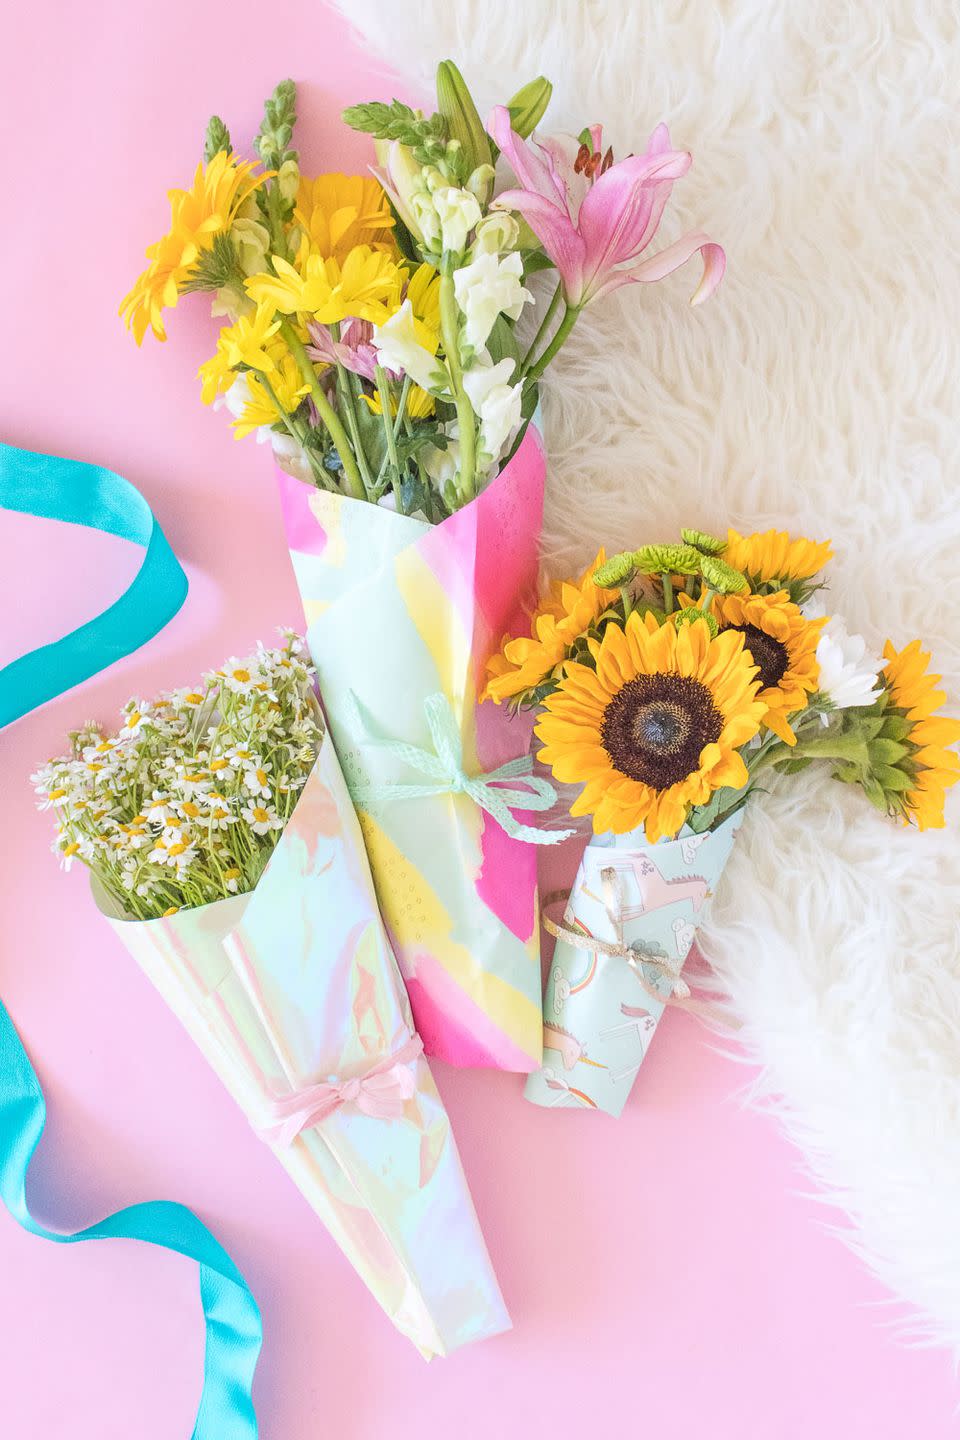
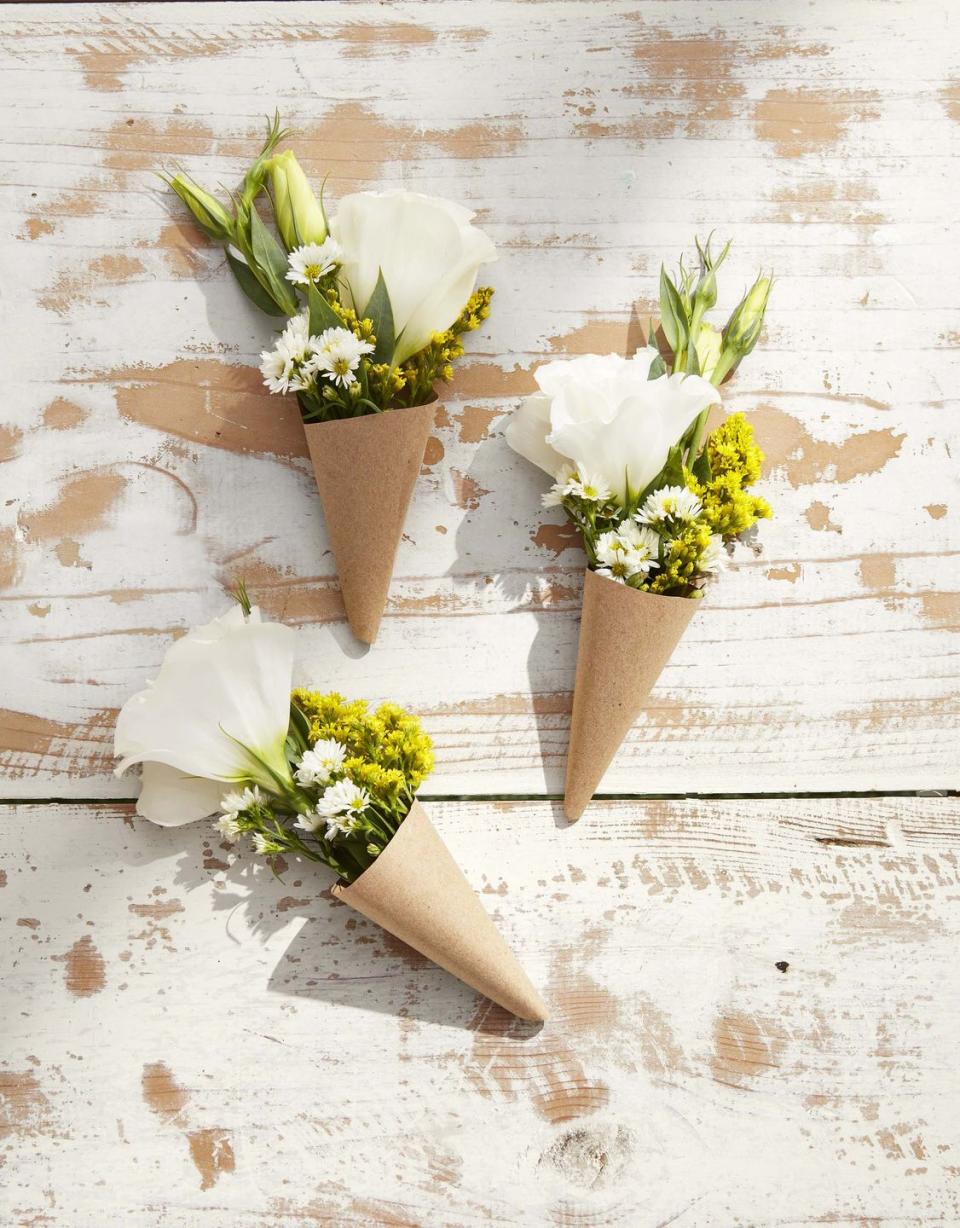
You may have her favorite blooms committed to memory by this point, but a floral Mother's Day gift really goes the extra mile when custom wrapping gets involved. Presentation is key, after all.
Get the tutorial at Club Crafted.

The cooking superstar will absolutely love a pop of color in the kitchen. Give her Mother's Day off, though—let Mom sit back and relax as you put these decorative spoons to good use for a celebratory holiday meal.
Get the tutorial at The Blondielocks.
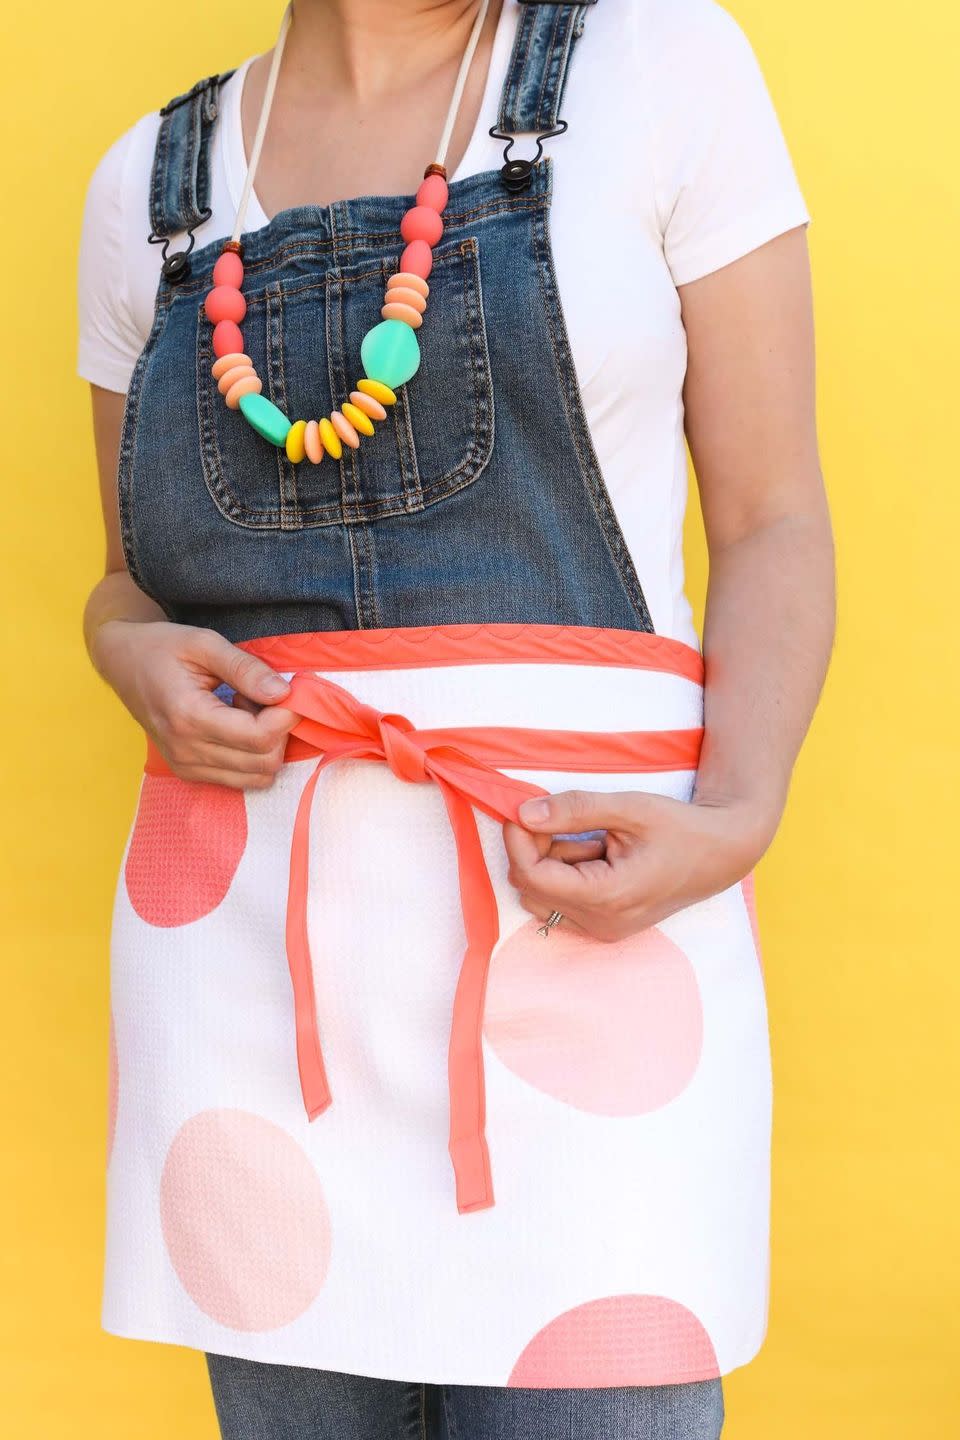
Pressed for time? Don't rush it—Mom deserves nothing less than the best, anyway. This DIY apron only requires a bit of sewing and 20 minutes of total manpower, yet hardly looks it.
Get the tutorial at Sarah Hearts.

Flowers and Mother's Day go hand in hand, but we encourage you to branch away from the bouquet this year. Instead, turned dried, pressed blooms into a decorative keepsake. Come on—how pretty is this?
Get the tutorial at Lilly Ardor.

Christmas came early this year—make her day with a collection of beloved memories-turned-ornaments, all worthy of spots on the tree come December. That's not to say these need to be stowed away until then, though—leave them hanging from Mom's nightstand drawer or on empty coat hooks in the meantime.
Get the tutorial at The Sweetest Occasion.
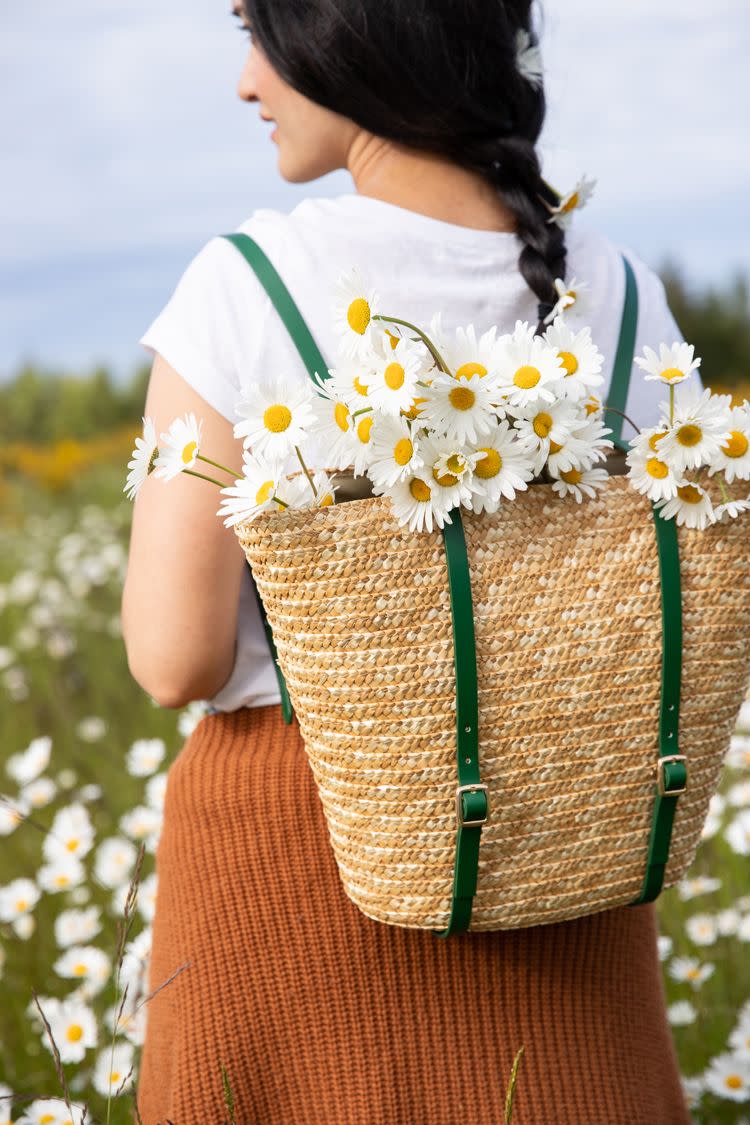
For the mother who's always on-the-go: this sturdy (and stylish) basket-meets-backpack will see her from the grocery store to the garden and everywhere in between. Just snag one of her old wicker beach totes and you're set for this no-sew DIY she'll never take off.
Get the tutorial at Delia Creates.

Protect Mom's eyes from intense spring and summer rays with her own signature set of shades, hand-painted by her favorite child.
Get the tutorial at Lovely Indeed.

So she can have somewhere special for her beauty sleep, put a personalized spin on her favorite pillow.
Get the tutorial at A Beautiful Mess.
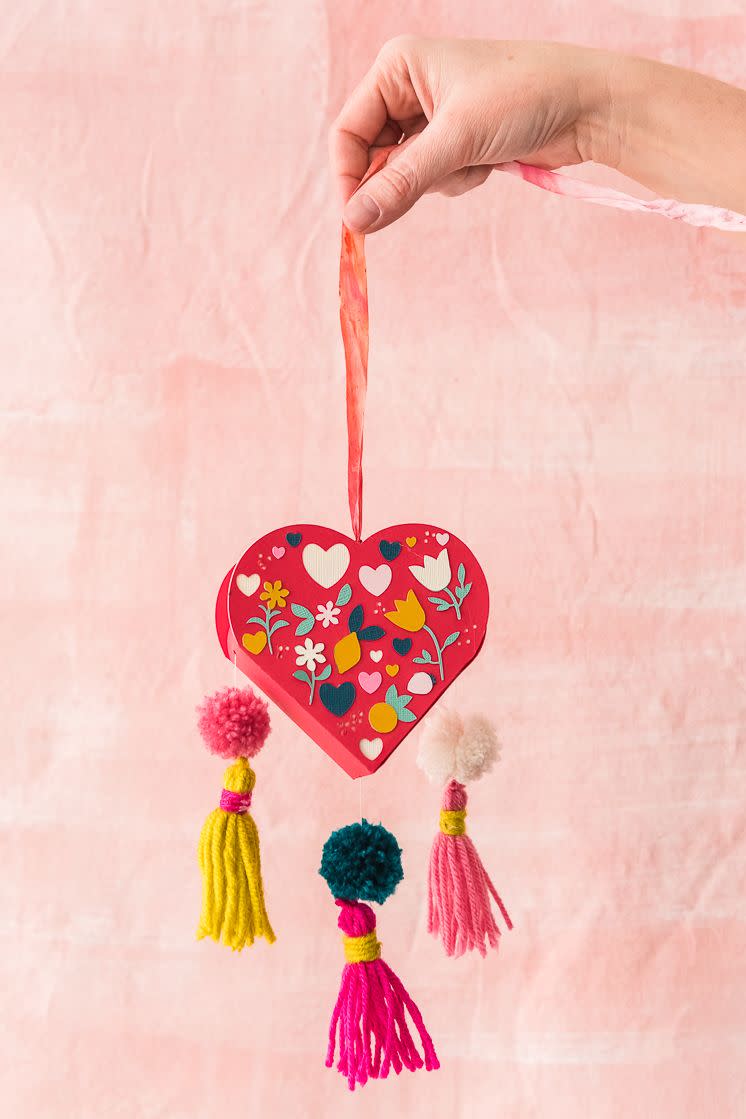
A hanging tassel decoration is all you need to show your appreciation for the woman who's always had your heart.
Get the tutorial at The House That Lars Built.

Little ones can get in on the crafting fun, too. Because no gift to Mom would be complete without a sweet, handmade card. May we recommend consolidating supplies and pairing with freshly baked cupcakes?
Get the tutorial at The Best Ideas for Kids.

You don't need to be a Picasso to make these pretty painted napkins for Mother's Day brunch. By stamping on the design, your flowers will look just as nice as that bouquet you got her.
Get the tutorial at The House that Lars Built.

Give Mom's fridge a fresh new look with these DIY flower magnets. She'll love using them to hang family photos and kids' crafts.
Get the tutorial at Lulu the Baker.
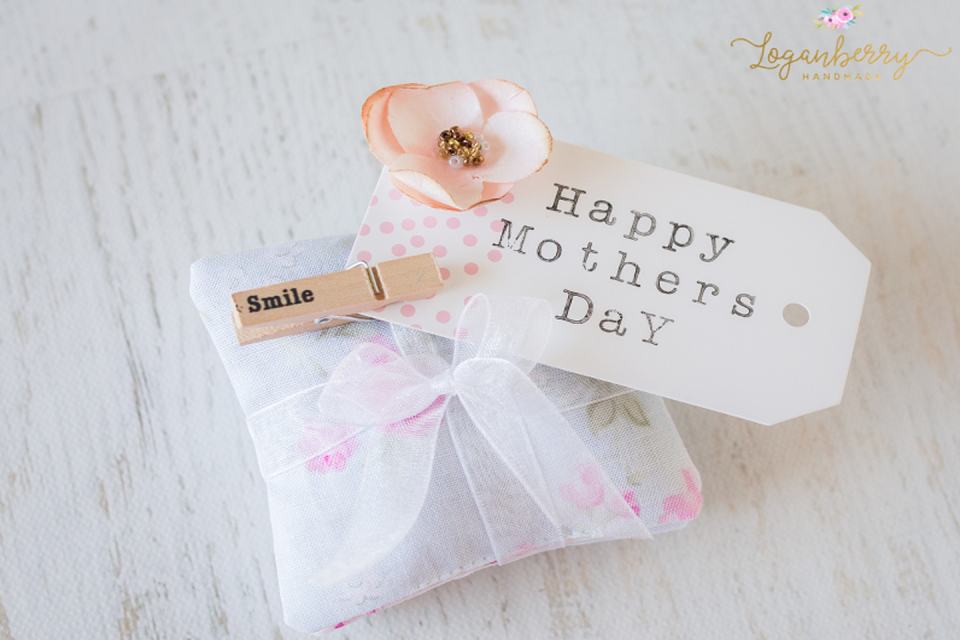
Customize these sweet-smelling pillows with the fabric of your choice. The whole craft comes together in mere minutes.
Get the tutorial at Loganberry Handmade.
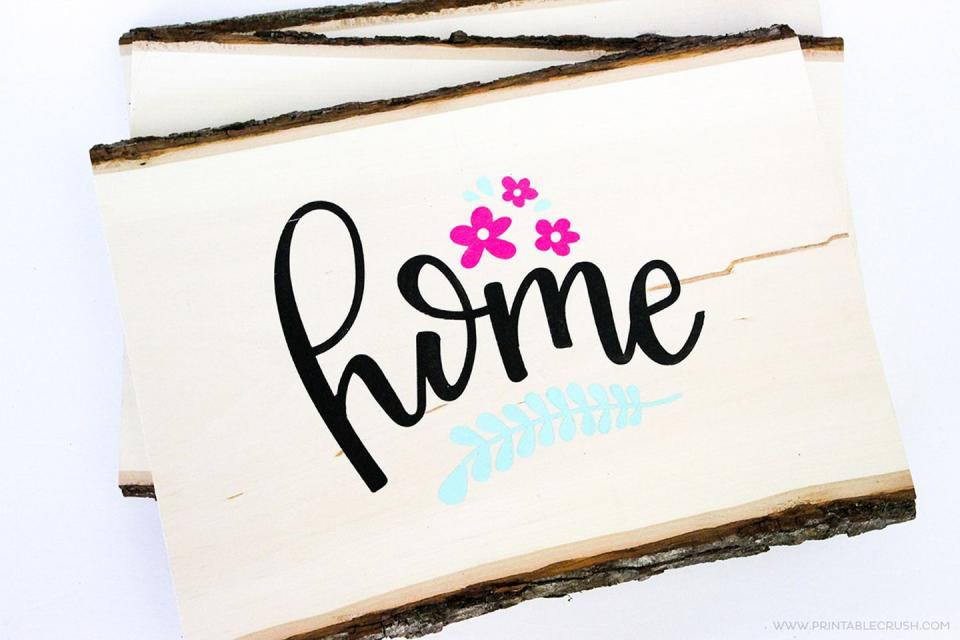
Not only does this blogger provide a step-by-step guide on how to make this handmade sign, but she also provides a variety of free printable designs, so your gift can look just as beautiful as this.
Get the tutorial at Printable Crush.
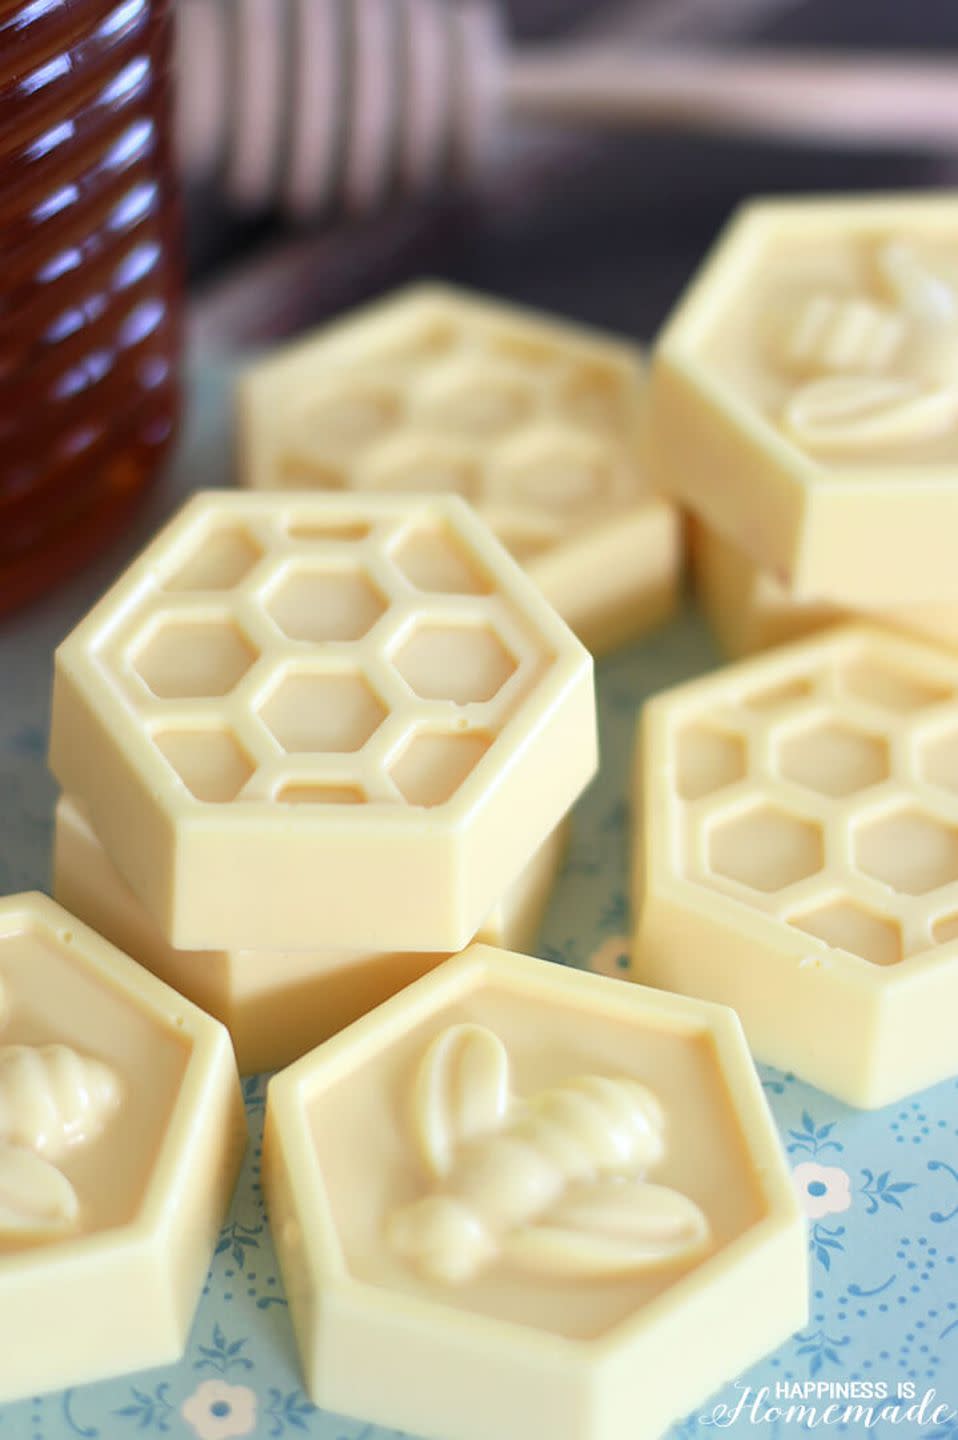
Forgot it was Mother's Day and need a last-minute gift? These homemade honey-themed soaps only take 10 minutes to make.
Get the tutorial at Happiness is Homemade.

Upgrade Mom's home decor with a wall hanging dusted in gold spray paint.
Get the tutorial at Oleander + Palm.
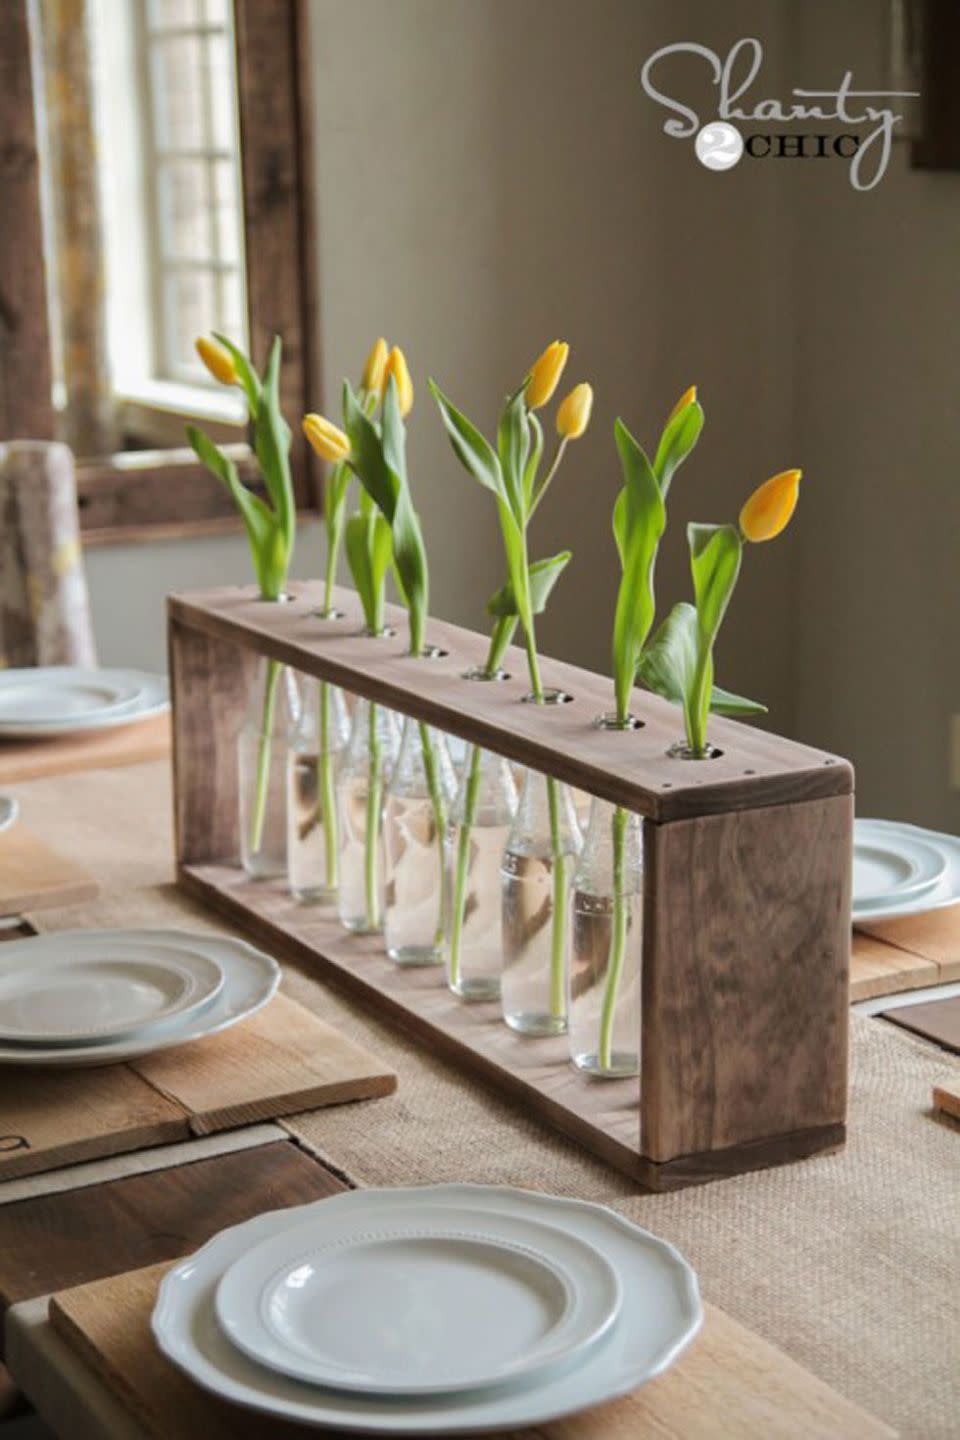
Place recycled glass soda bottles in a pine or whitewood frame and fill with fresh Mother's Day flowers for a breathtaking centerpiece she'll love.
Get the tutorial at Shanty 2 Chic.

Stitch together a handful of zippers to form one seriously cool case.
Step 1: Place seven 7-inch-long zippers facedown on your work surface, positioned horizontally with the long sides touching. Each zipper pull should be on the opposite end of the one before.
Step 2: With right sides facing, pin together the top edge of the bottom zipper and the bottom edge of the zipper above it. Working up, repeat this step until all the zippers are pinned together to form a rectangle. Using matching thread and removing the pins as you go, machine-stitch the zippers together, leaving a ?-inch seam allowance. Then, snip away any excess thread and iron the seams flat. Open the center zipper one inch.
Step 3: Cut a 6"W x 8"L rectangle of coordinating fabric. Position the zipper rectangle on the fabric, right sides facing. Pin all four edges, then sew, leaving a ?-inch seam allowance. Trim away the zipper tape ends and any excess fabric. Finally, fully open the zipper from Step Two, turn the bag right side out, and iron the seams flat.
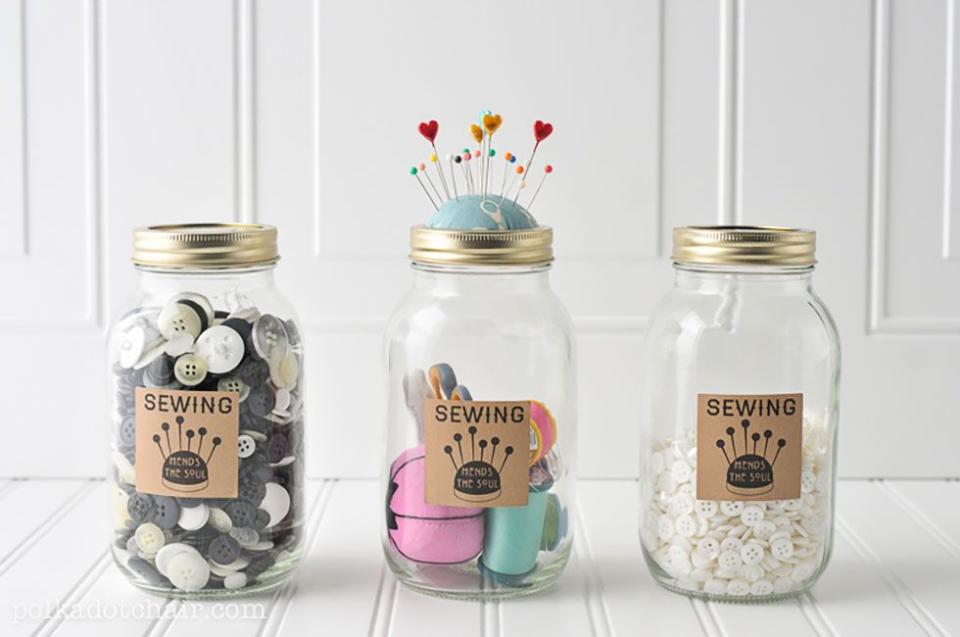
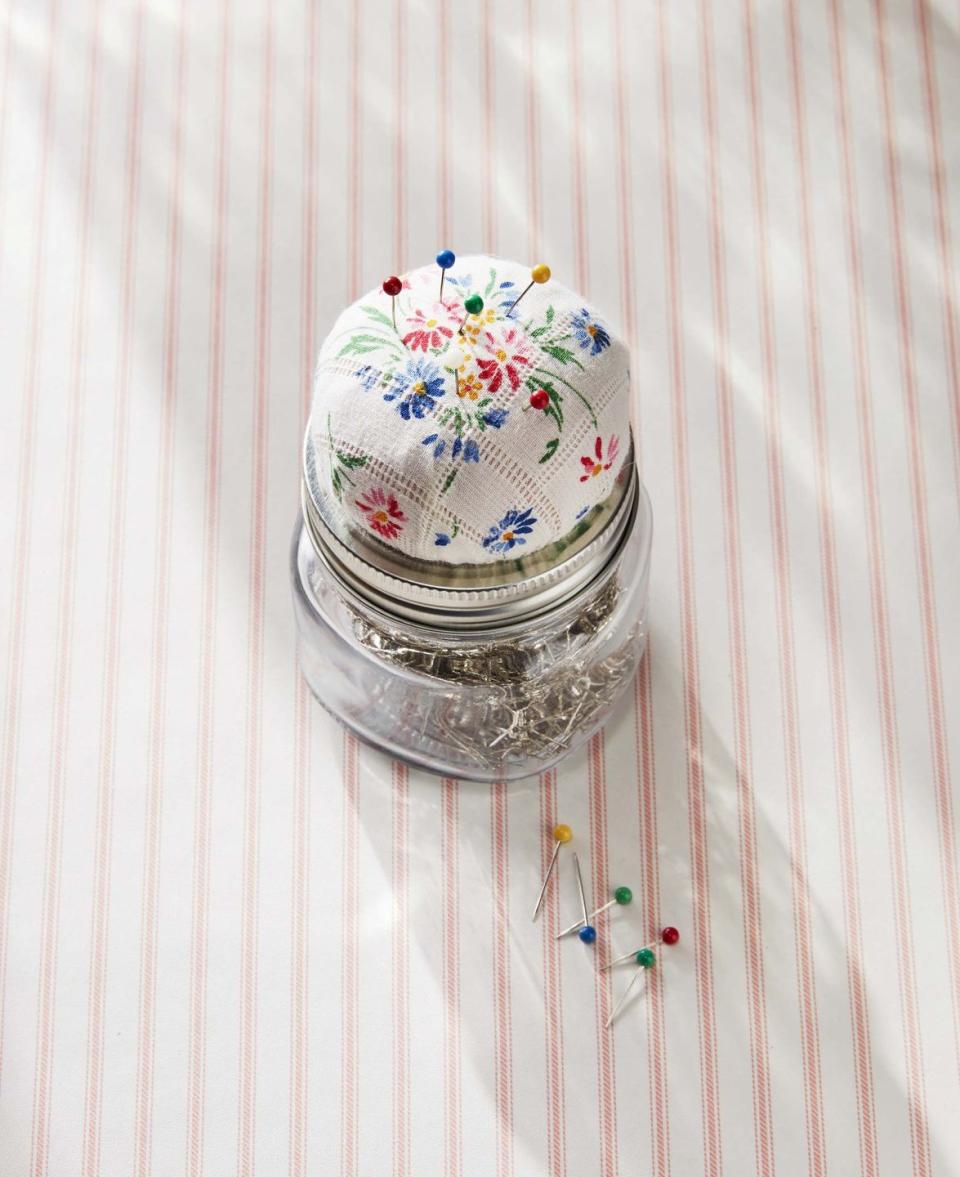
There are quite a few Mason jar crafts out there that would make fantastic Mother's Day gifts, but we especially love this delightful sewing kit project featuring a genius pin cushion lid.
Get the tutorial at Polkadot Chair.
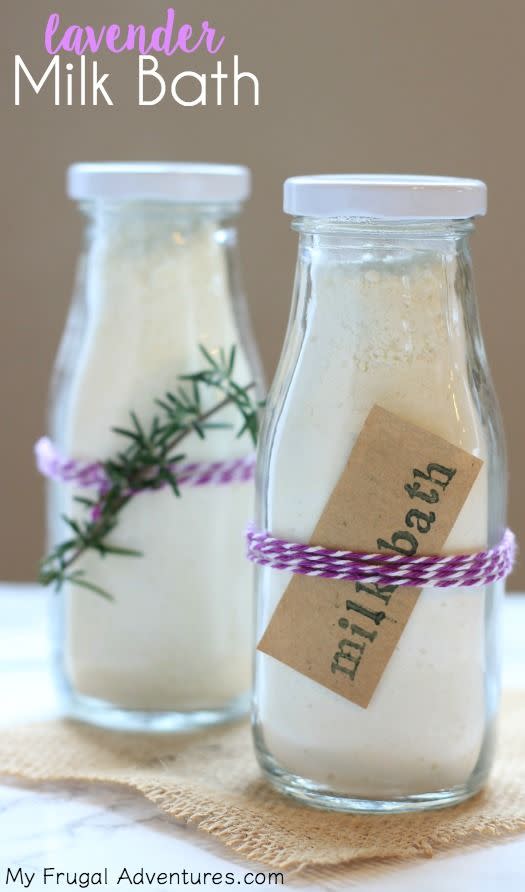
Treat her to the rest and relaxation she deserves with this DIY luxurious milk cleanser. The powdered milk moisturized skin while the lavender gives off the most calming scent, creating the ultimate bath experience.substitutes.
Get the tutorial at My Frugal Adventures.

If you're like us, you have a growing wine cork collection that basically just sits there. Put it to good use by making mom a beautiful vase. Grab a vase at the dollar store and this craft will cost you next to nothing. (Pair this gift with an actual bottle of wine for extra brownie points.)
Get the tutorial at Design Improvised.

Who doesn't love showing off some hometown pride? Blogger Amanda has a super-easy tutorial for turning string and nails into a statement piece.
Get the tutorial at Crafts by Amanda.

This fold-over clutch made with soft lambskin leather can be used as an evening purse, or as a small travel pouch to hold jewelry.
Get the tutorial at Polkadot Chair.
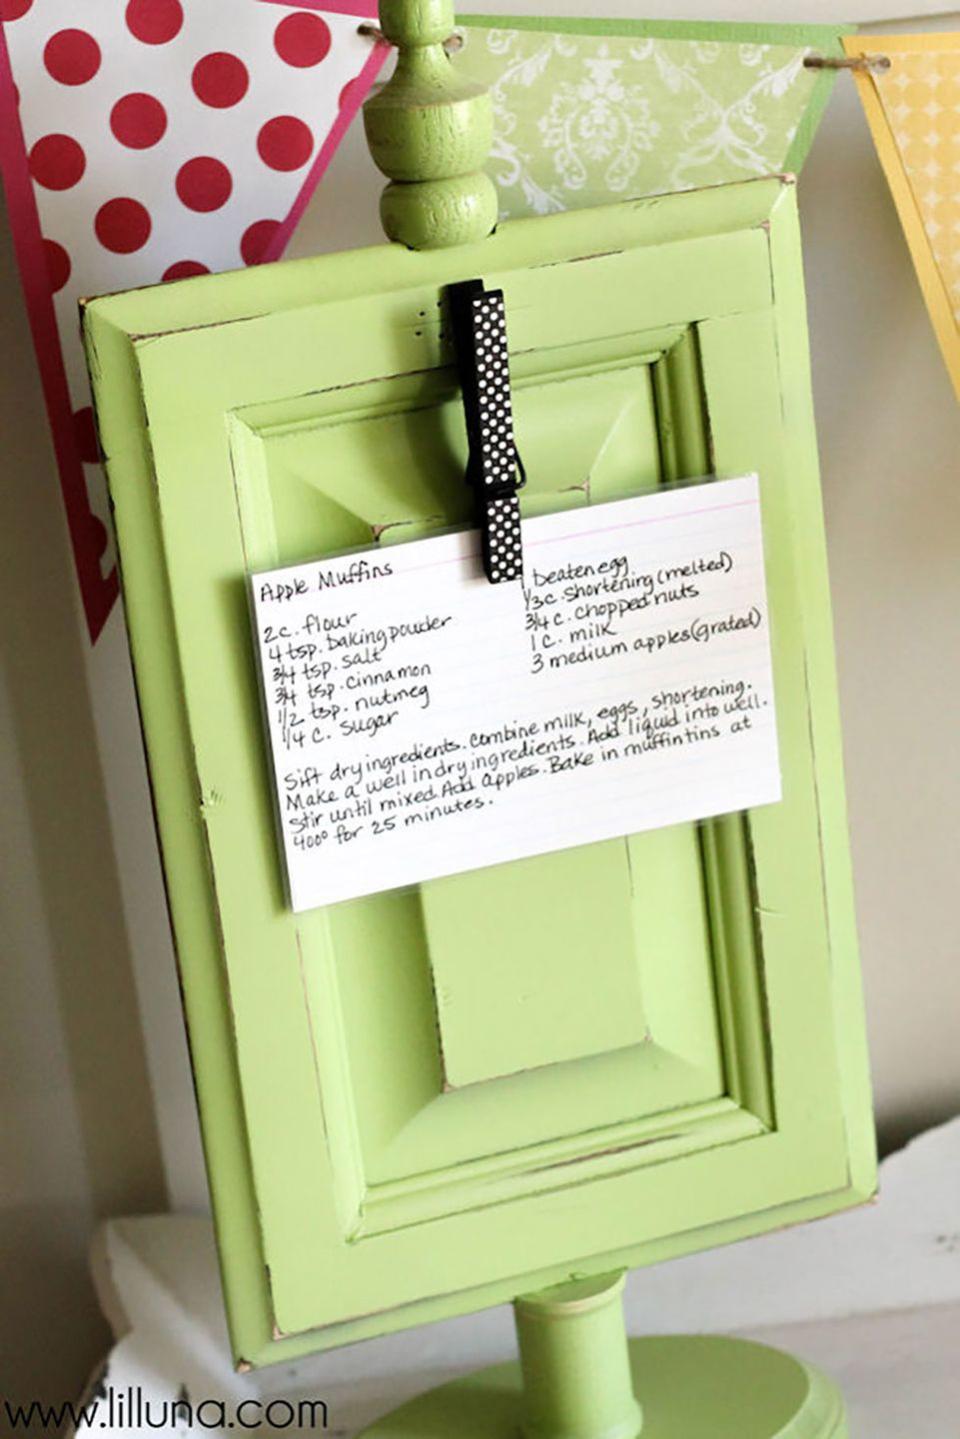
Attach a patterned clothespin to an elevated wooden frame to make a recipe holder that'll keep mom's favorite recipe cards out of the splatter zone.
Get the tutorial at Lil' Luna.

Hot-glue faux flowers inside a hollow papier-maché letter for a personalized gift that'll keep blooming year round.
Get the tutorial at LuLu*s.
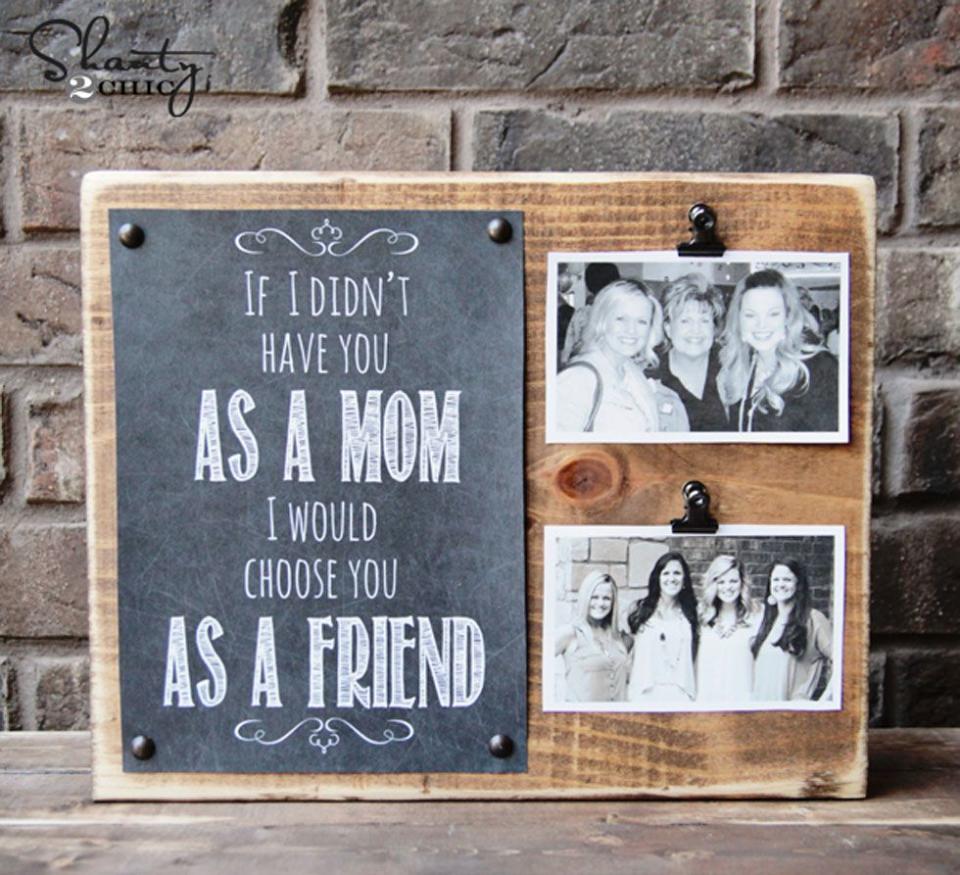
Show mom what she means to you by clipping some of your favorite snapshots to a stained pine board and pinning on a handwritten note or a heart-warming printable.
Get the tutorial at Shanty 2 Chic.

Whip up a Scandinavian-style table protector from–get this–wooden clothespins and floral wire. Oslo-born crafter Paul Lowe shares his easy how-to in Sweet Paul Eat and Make ($30; Houghton Mifflin Harcourt). Simply disassemble 40 clothespins, lay them flat side down, and drill a hole in each, about ? inch from the tapered end. Thread the pins onto the wire with the double-notched sides facing right, as shown. Then, pull the wire into a circle and twist the ends to secure. You'll be done before the kettle boils.
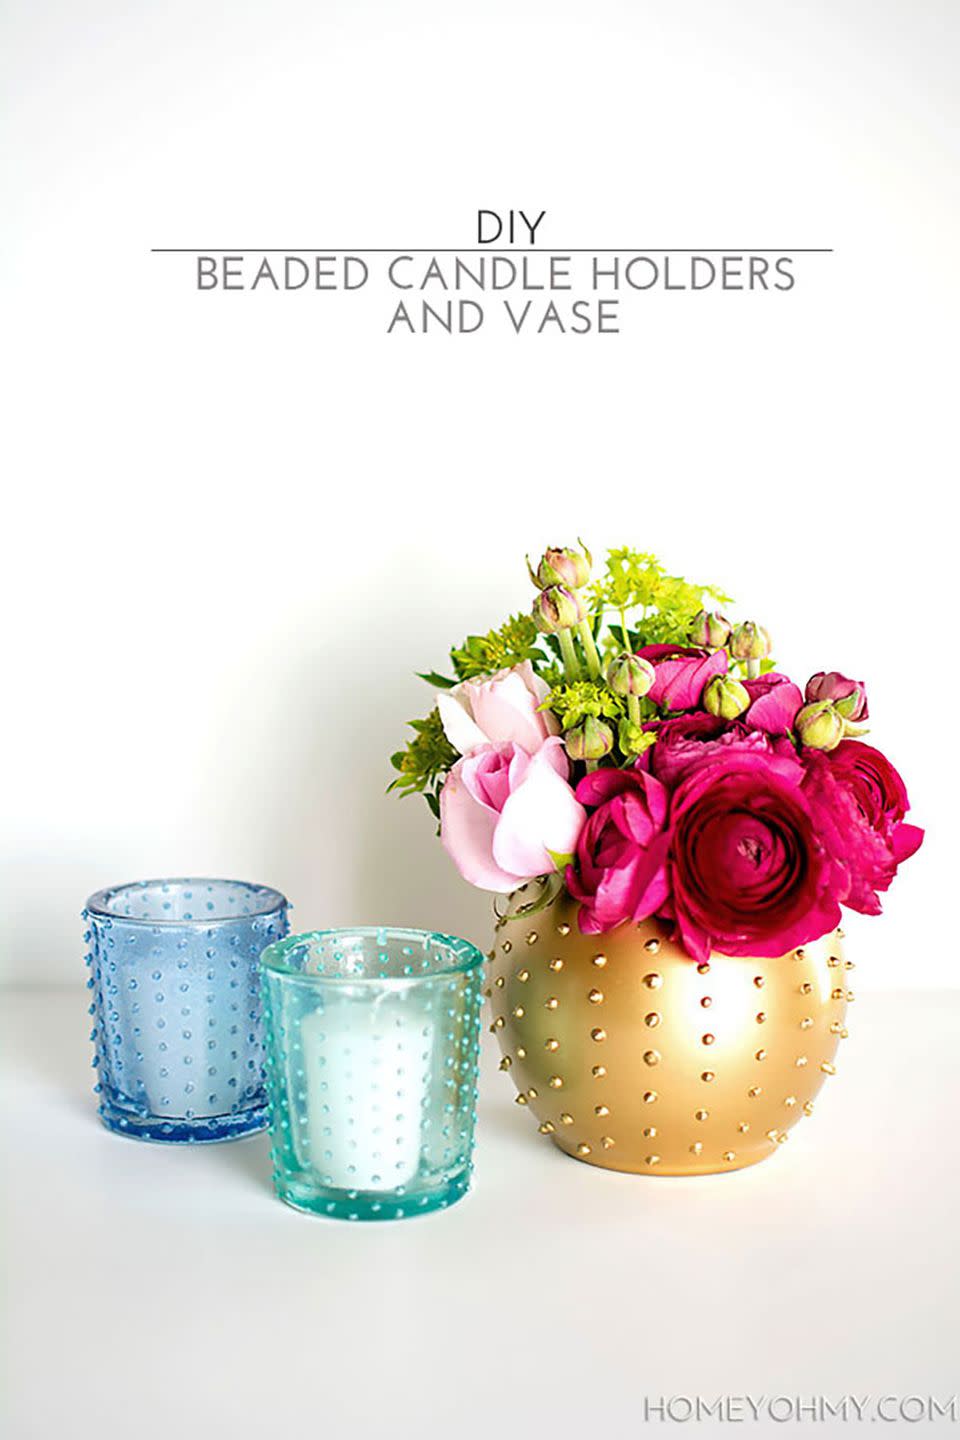
Create this fun "beaded" look by dotting clear transparent paint onto a plain candle holder or vase, then painting it with colored transparent glass paint.
Get the tutorial at Homey Oh My.

For a truly heartfelt gift, brainstorm 52 reasons you love your mom and glue one reason to each card in a full deck.
Get the tutorial at Ziploc.

Upgrade your picnic table with gilded DIY vases and votives. Use a foam brush to apply adhesive to the outside of a mason jar in small, irregular patches. When the sticky substance turns clear—in about 30 minutes—press-on sheets of gold leaf. Then, rub away excess flecks with a paper towel for a lovely weathered patina.
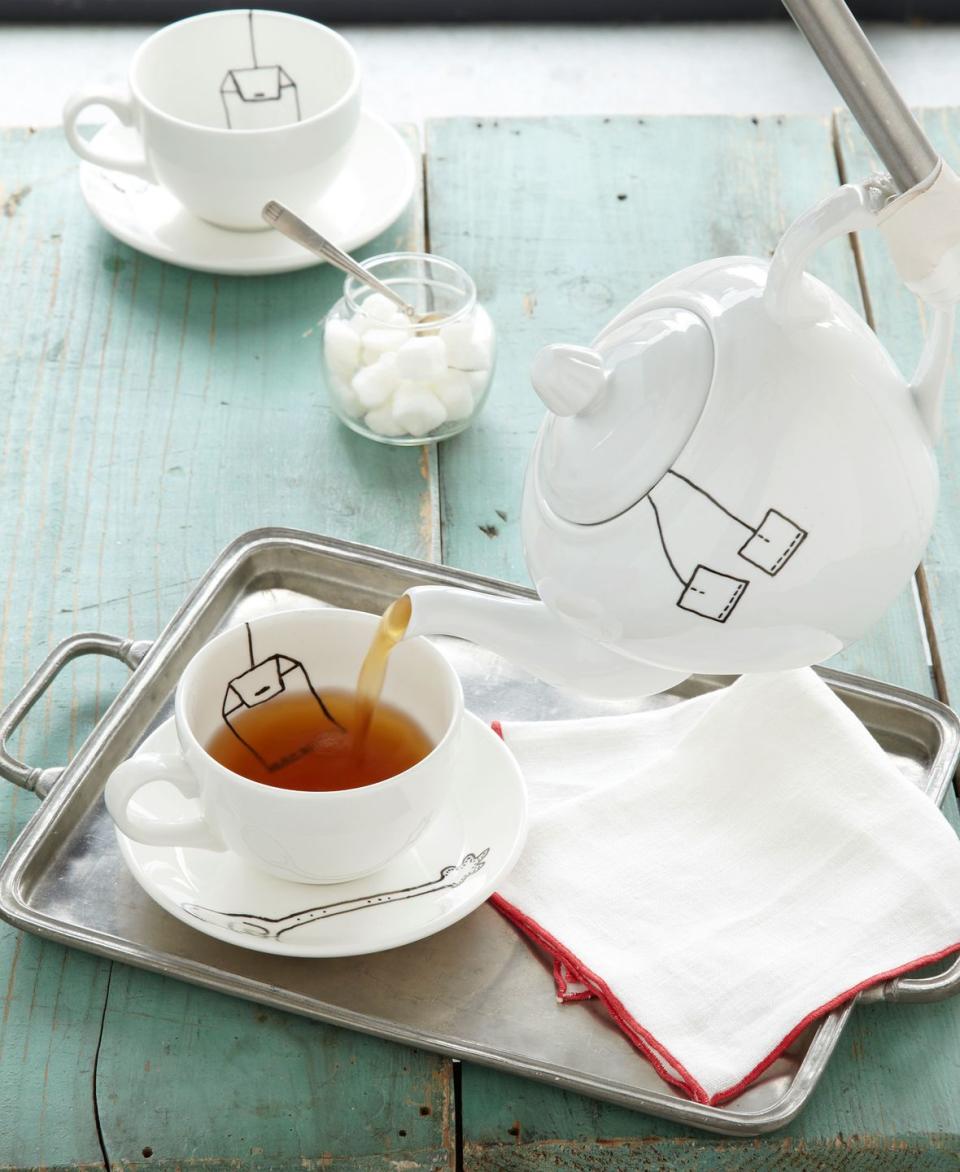
This witty set starts with plain ceramic dishes (for similar cup and saucer set, $4.99, and teapot, $9.89; englishteastore.com). To get the show on the road, freehand the tea bag, tag, and spoon designs, using our image as a guide, with Pebeo's Porcelaine fine-point marker ($4.82; dickblick.com). Don't worry if you make a mistake—the ink can be washed away for up to 72 hours. Allow at least 24 hours' drying time, then bake the items for 35 minutes in a 300°F oven. Let cool completely, and wash (the ink's dishwasher safe!) before brewing up a spot of Earl Grey.
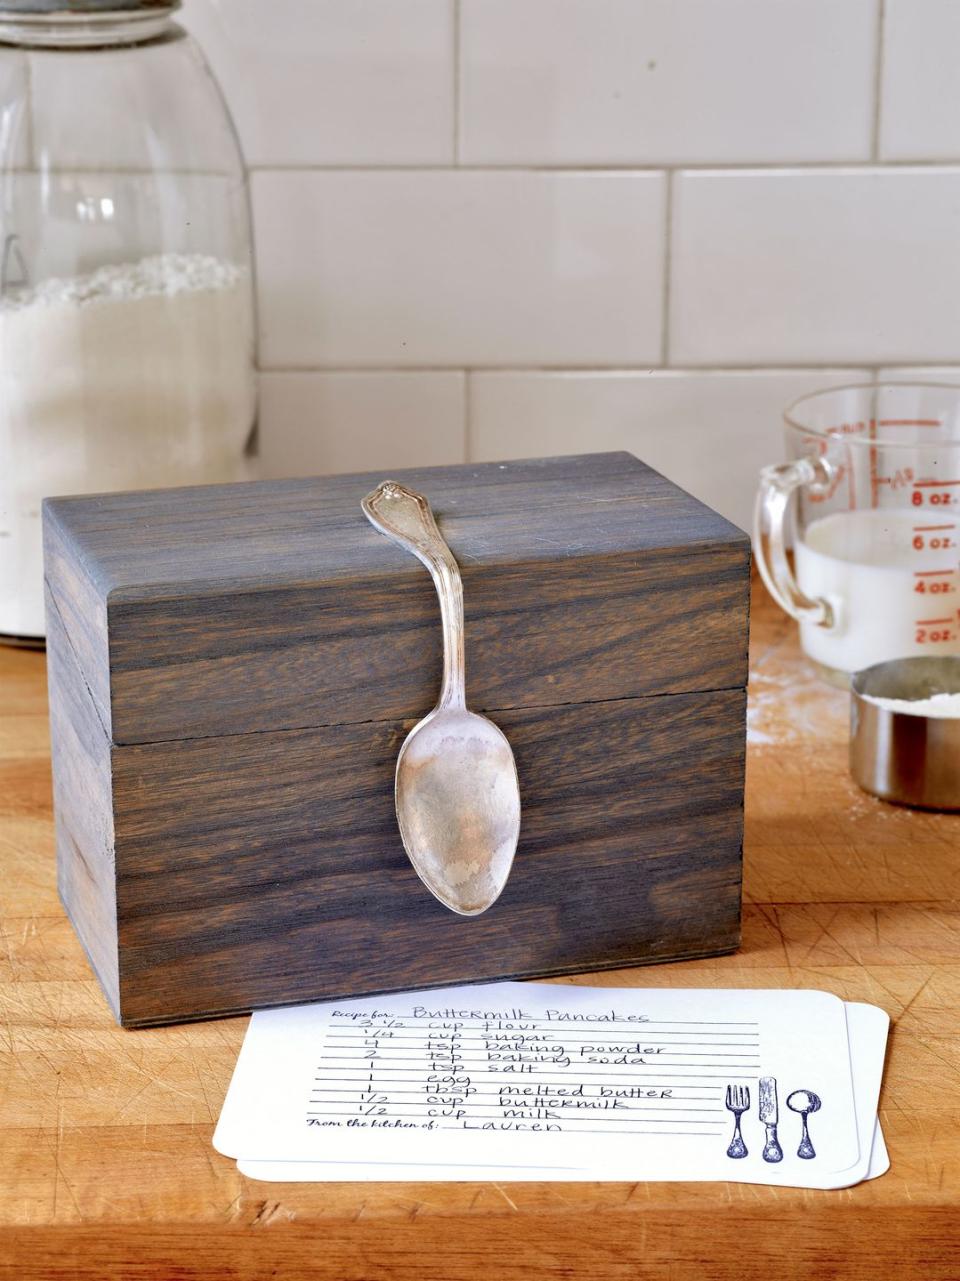
Turn a $5 box into a fabulous recipe organizer. A flea-market spoon is the secret ingredient to punching up an unfinished box (6 9/16"W x 4 5/8"H; michaels.com for stores).
Step 1: With a foam brush, stain the box, inside and out, with Minwax wood finish in Classic Gray ($8.97 per quart; homedepot.com). Let dry overnight.
Step 2: Using your hands, bend a teaspoon at a 90-degree angle. Lightly sand the widest point of the handle's back side.
Step 3: Apply Glass, Metal & More glue along the sanded area ($4.88 for 2 oz.; stuff4crafts.com). Center the spoon atop the box, press and hold for one minute, then let set overnight.
For extra flourish, include a set of recipe cards. ($8 for 10; jacquelynvaccaro.etsy.com)

An alphabet's worth of metal hot stamps transforms a wood-burning pen into a label maker for cutting boards (stamp set, $19.99, and wood-burning pen, from $9.99; walnuthollow.com. Cutting boards, $12.96 each; 12"L x 8"W x 1"H; hardwood-lumber.com).
First, measure and mark, in pencil, the center point of one long side of your cutting board. On a flat surface, arrange the stamps to spell out your word. Measure the word's length, and divide that number in half. Measure that distance to the left of your board's center point and mark the spot. The left side of your word's first letter should align with this mark. Load the first letter stamp onto the pen and press it onto the wood; continue with the other letters to spell out your word. Finally, erase any pencil marks and get chopping!

Secure your secret musings in a journal (Semikolon, $14.95; 6"W x 8?"L; amazon.com fastened with two matching watchbands ($10.95 each; 18mm; amazon.com).
Step 1: Measure and mark two spots inside the front cover of your notebook: one, two inches from the top; the other, two inches from the bottom; both, 1 1/2 inches from the spine. Next, measure and mark two spots inside the back cover: one, two inches from the top; the other, two inches from the bottom; both, 5 1/2 inches from the spine. Using a hammer and a four-penny nail, punch holes through all four marks.
Step 2: For each of the four watchband pieces, measure and mark a spot 1/8 inch from the end that would attach to a watch. Use the hammer and nail to punch through all four marks.
Step 3: Place one buckle-end watchband piece atop the front cover, aligning the punched holes. Push one 5/16"W × 5/16"L brass rivet through both holes; set according to package instructions (Rivets and Setter Kit, $12; amazon.com). Repeat for the other hole and buckle-end watchband piece. Then flip the notebook over and repeat for the remaining hole and watchband pieces.

Get a load of this fresh notion for something you probably already have around the house! Emily Peters sells these baubles at our Country Living Fairs (emmalouvintage.etsy.com), but she's also generous enough to tell you how to craft your own. If you become so carried away that you need more buttons, Etsy.com has a killer selection of vintage ones.
Step 1: Start with an adjustable brass "ring blank," the band that wraps around your finger.
Step 2: If your button has a shank on the back, snip it off with wire-cutting pliers and sand down the back surface with a rotary tool (Dremel 4.8-volt, $24.97; homedepot.com).
Step 3: Apply a thin layer of metal-bonding glue (Beacon's Glass, Metal & More glue, $6.99 for two ounces; createforless.com) to the back of your button, then adhere it to the top of the ring blank. If you'd like to add a second button, apply a thin layer of the glue to its back side, then adhere it atop the first button. Let dry for 24 hours.

It's easy to fall in love with vintage scarves at flea markets and thrift stores. The hard part? Finding a fresh way to wear the ladylike relics. Here's one: Just remove the straps from a watch, then weave a scarf through the watch's lugs (the bars that hold the straps in place). Wrap the scarf's ends around your wrist and secure with a knot to make a timely fashion statement.
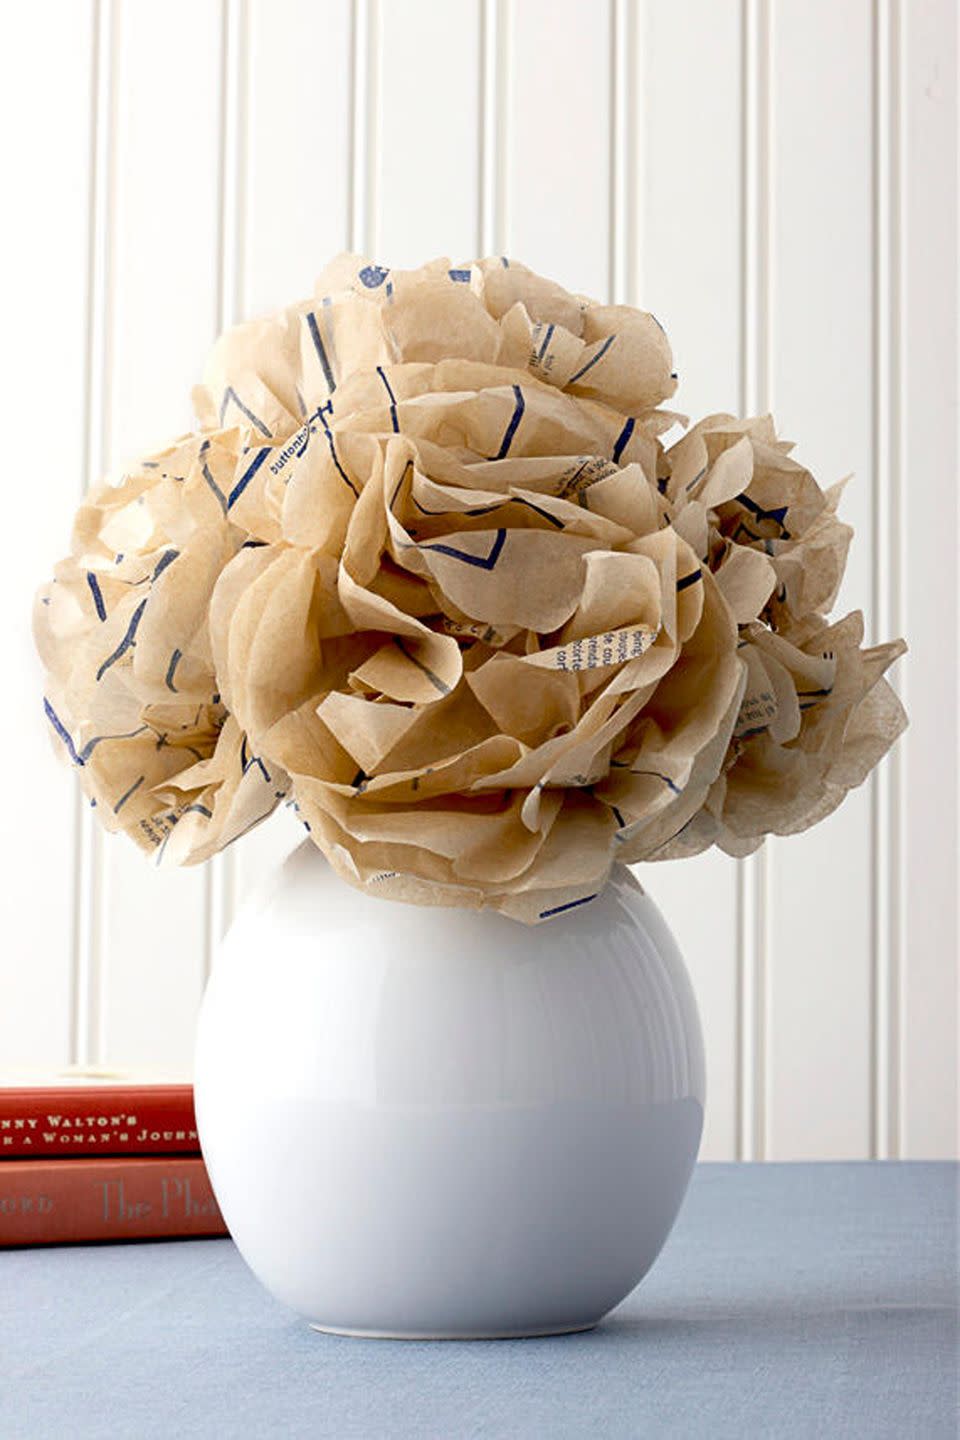
An elementary school craft takes on a sophisticated edge when fashioned from the tissue-thin paper of old sewing patterns.
Step 1: For each flower, cut six 7-inch squares from the pattern. Stack and fold them accordion-style six times, forming a one-by seven-inch rectangle. Snip off the corners of the rectangle with scissors.
Step 2: Tightly twist a wire floral stem around the center of the rectangle.
Step 3: Fan out the paper, then pull apart each layer, creating the blossom.

Boost even the most basic topper with a row of raffia flowers. Here's how to make each blossom, in three steps:
Step 1: Cut a piece of cardboard that's approximately four inches long and one inch wide. Cut a length of raffia to approximately six feet ($7.50 for 60 feet; raffit.com). Tightly wrap the raffia around the cardboard lengthwise.
Step 2: Carefully slide the wrapped raffia bundle off the cardboard, then tie a two-inch length of raffia around the bundle's middle. Snip through the looped raffia at both ends. Repeat three more times to create four bundles.
Step 3: Stack the bundles atop one another as shown, then tie the entire stack together in the middle with a three-inch-length of raffia. Fan the bundles to make the flower appear full. Repeat as desired, making enough flowers to encircle your hat's brim.
To attach the blooms to one another, and your hat, cut another length of raffia to approximately four feet. Slide the raffia through the center knot of each flower. Push the flowers together, then tie the raffia around your hat's brim and trim any excess raffia — to fashion a bonnet in full bloom.
DIY Mother's Day Gifts for a Present From the Heart
Whether it's for your mom, grandmother, aunt, or any of the other special woman in your life, one of these DIY Mother's Day ideas will make a kind and thoughtful gift. If you're going entirely DIY or want something small to accompany the Mother's Day gifts you've already purchased, look no further than this list of creative crafts. From gorgeous floral arrangements to personalized home decor, there's something in here that will suit any style. (You can also download and print one of these fun "Do Not Disturb" Mother's Day door hangers or "Best Mom Ever" certificates—hey, printing counts as DIY!)
For a small but heartfelt creation, sew a pillow sham from a vintage handkerchief or fashion a clay trinket dish with a saying she loves stamped on the bottom. We also have ideas for more involved projects, such as a basket backpack mom can use to tote her important items or the Mason jar string art for a beautiful wall decoration. Don't have a lot of time, no worries, there are plenty of last minutes ideas you can easily put together. Some of these ideas make for stunning spring crafts by incorporating lots of floral ideas, including homemade vases and seed packets. However you want to celebrate mom and the special women in your life this year, you're sure to make their hearts full with one of these meaningful DIY Mother's Day gifts they'll cherish forever.
She'll cherish your creation forever.
Solve the daily Crossword